Defining Parsing Logic
Configuring parsing logic refers to the process of setting up rules and parameters within an OCR system to accurately extract specific data fields from utility bills. This involves defining how the OCR software should interpret and process different sections of the bill to capture relevant information such as billing dates, meter readings, and charges. By configuring parsing logic, users ensure that the OCR system can effectively recognize and extract the required data from utility bills, improving accuracy and efficiency in bill processing workflows.
To define a parsing logic,
Navigate to the Bill Parser section. The list of all configured parsing logics appears, as shown below.
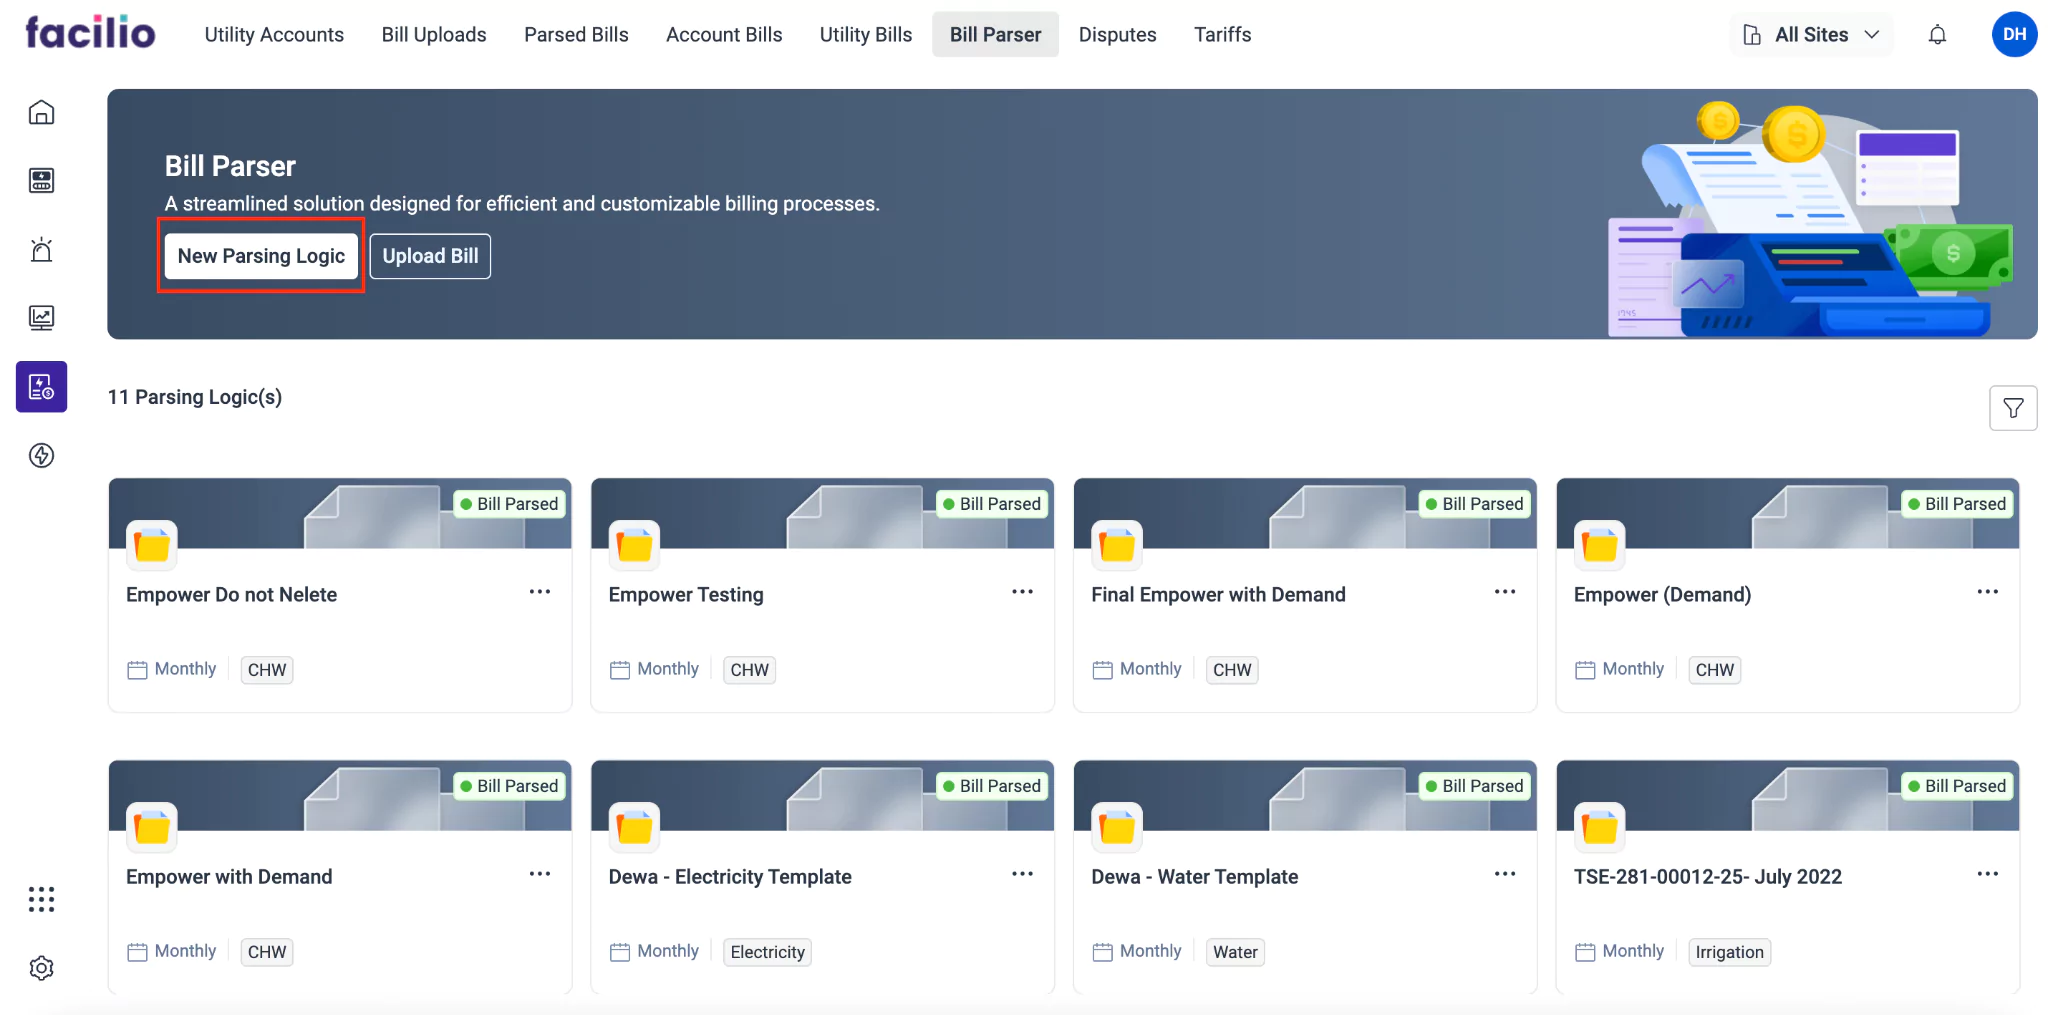
Click New Parsing Logic. The New Parsing Logic screen appears as shown below.
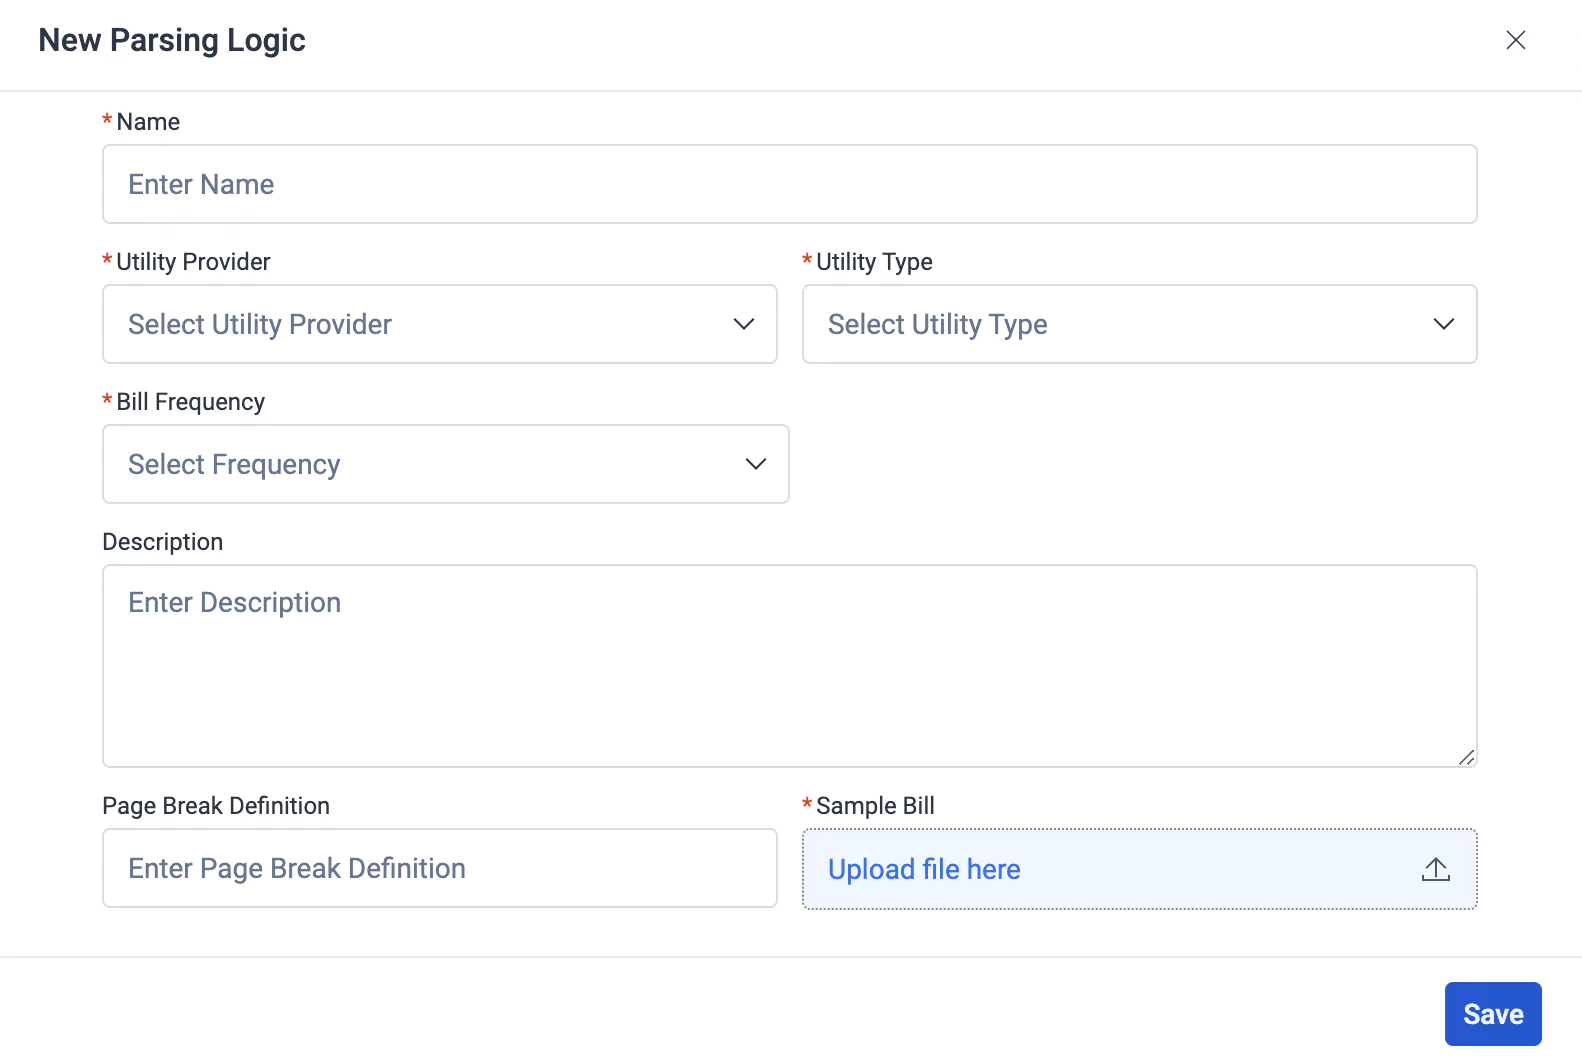
Update the required fields in this screen:
Name - A label to identify the parsing logic
Utility Provider - The company or organization responsible for providing the utility service, such as electricity, water, or gas
Utility Type - The specific type of utility service being billed, which could include electricity, water, gas, or others.
Note: The application enables you to configure field mappings for each utility type added in this field, resulting in the generation of separate utility bills with customized data extraction rules for each utility type.Bill Frequency - The frequency at which utility bills are generated, such as monthly, quarterly, or annually.
Description - Additional information or notes about the parsing logic, such as specific parsing rules or considerations.
Page Break Definition - Criteria or rules for identifying page breaks within multi-page bills, helping the OCR system correctly parse data across multiple pages.
Sample Bill - A sample utility bill used to define and validate the parsing logic, ensuring accurate extraction of data fields under various scenarios.
Note: For optimal processing, it is recommended to upload bills in PDF format. This ensures smoother extraction and accurate parsing of data from the bills.
Click SAVE. The parsing logic is successfully saved.
You can now define the field mappings, specifying how details in the bill should map to corresponding fields in the application. Read the Configuring Field Mapping section for more information.
Configuring Field Mapping
Configuring field mapping involves setting up rules within the Utility module to accurately map extracted data fields from utility bills to corresponding fields in the application. This process ensures that the extracted information, such as billing dates, meter readings, and charges, is correctly aligned with the appropriate data fields for further processing or analysis. By configuring field mapping, users establish a structured and standardized approach to organizing extracted data, facilitating seamless integration with existing systems and workflows. To configure field mapping,
Click the
 (Horizontal ellipsis) icon corresponding to the required parsing template (in the Bill Parser section) and click Configure.
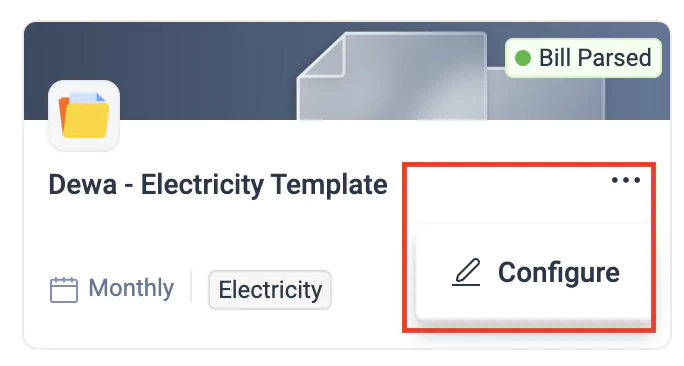
The respective field mapping screen appears, as shown below.
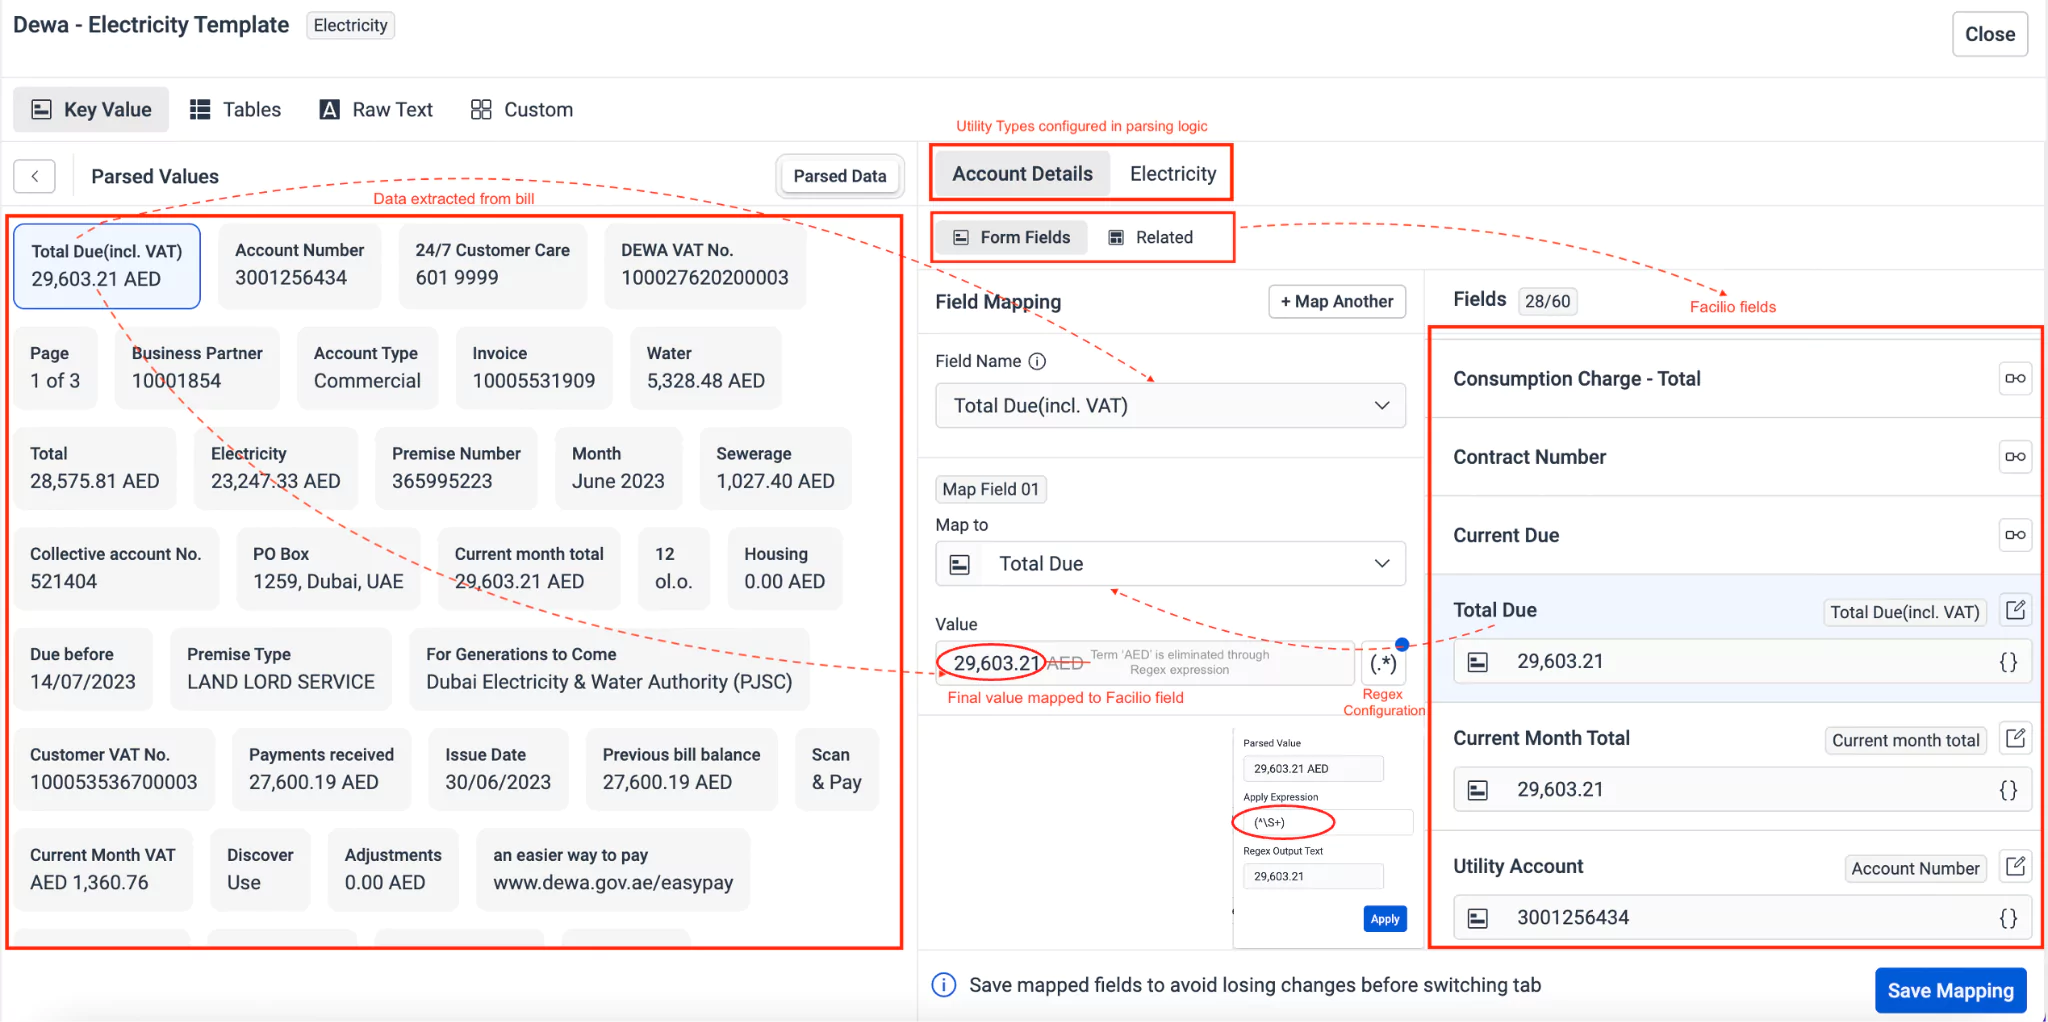
Select the required field/value from the following sections for which the application mapping has to be configured:
- Key Value
- Tables
- Raw Text
- Custom
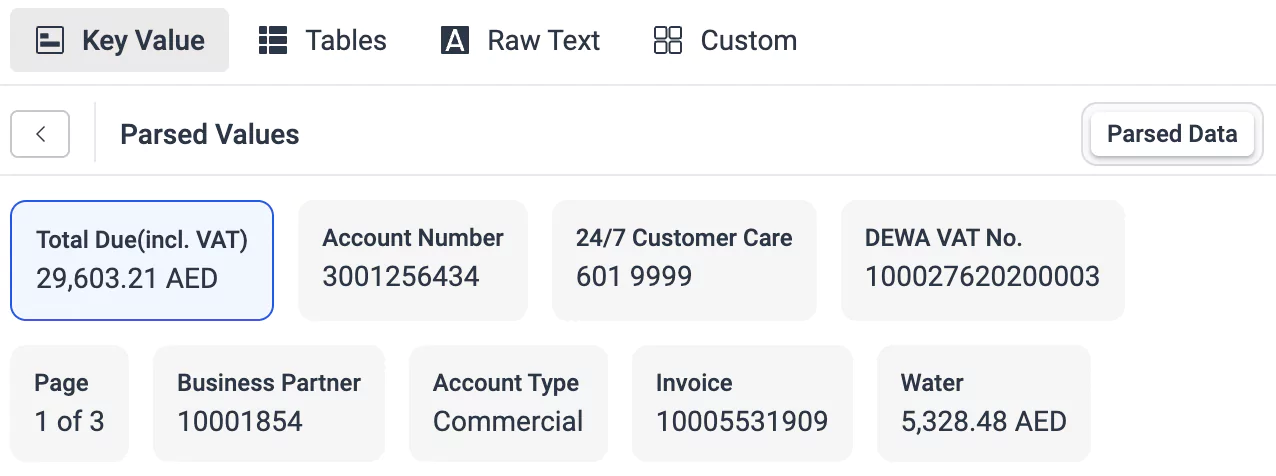
This section allows you to map data from key-value pairs extracted from the uploaded bill. Key-value pairs represent specific data elements and their corresponding values found within the bill text (for example, Issue Date: 31/10/2023; Account Type: Commercial). By mapping fields within key-value pairs, you can accurately extract and categorize important information such as dates, account numbers, and transaction amounts from the bill text. This structured approach to data extraction enhances accuracy and efficiency in processing utility bills.
You can select a field from the parsed data to map it to an application field.
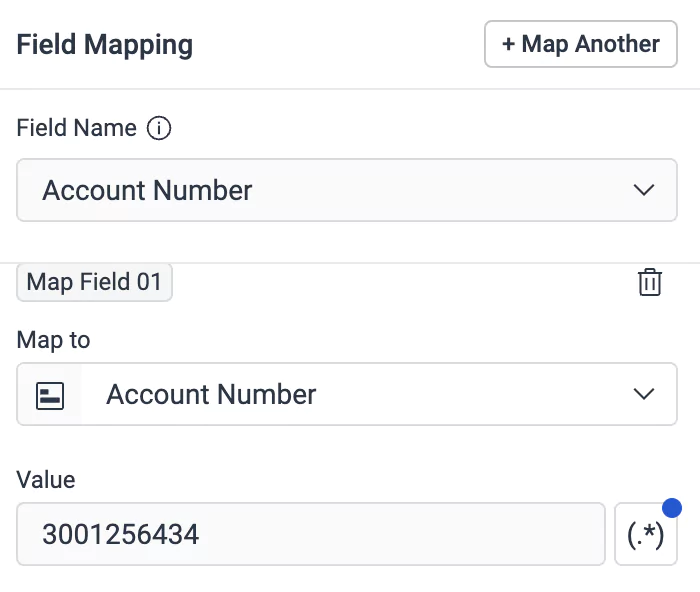
The selected field name and its corresponding value are populated in the Field Name and Value fields, respectively in the Field Mapping section as shown below.
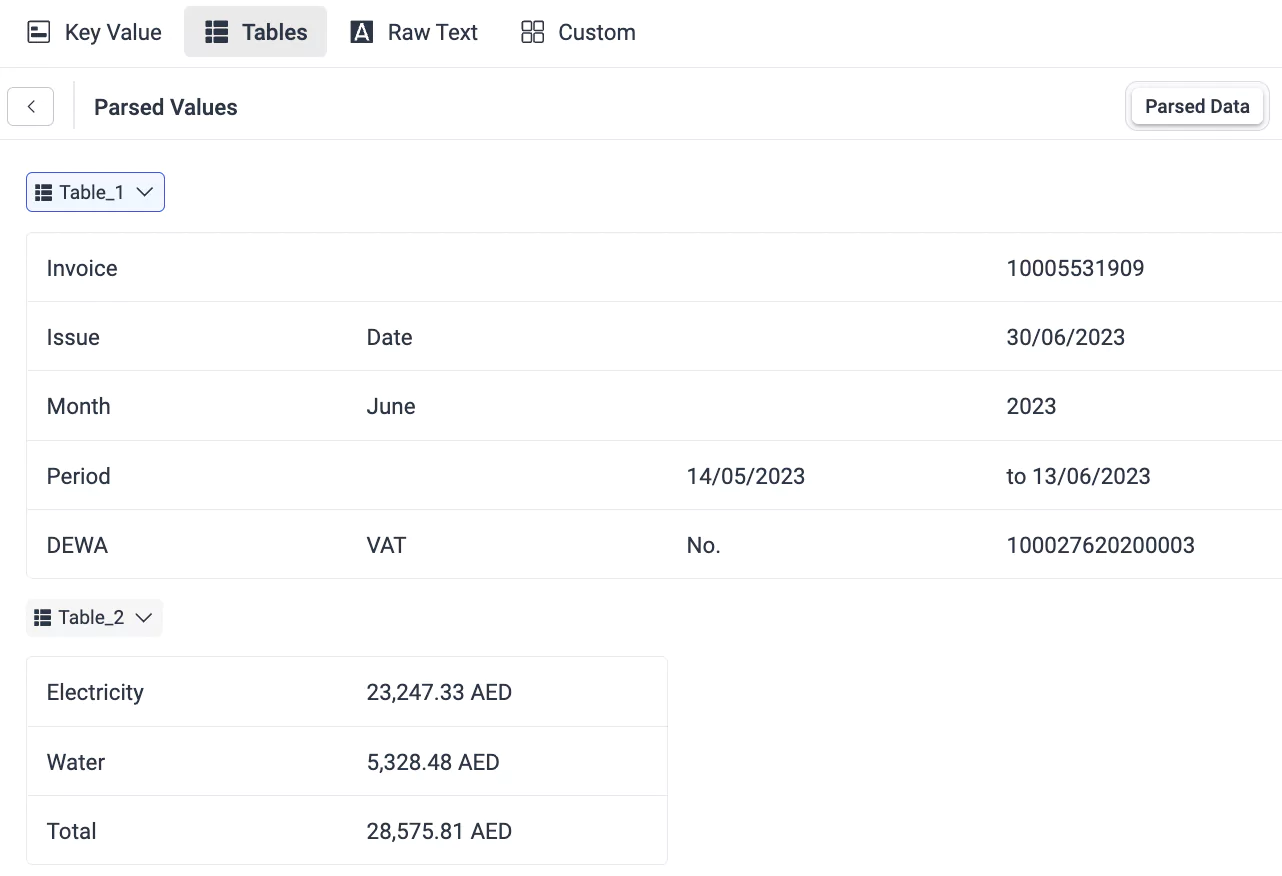
This section allows you to map data from tables found within the uploaded bill. Tables are commonly used in utility bills to present structured information such as meter readings, usage charges, and tariff rates. By mapping fields within tables, you can ensure accurate extraction of data presented in tabular format.
You can select a table from the parsed data to map one of its cell values to an application field.
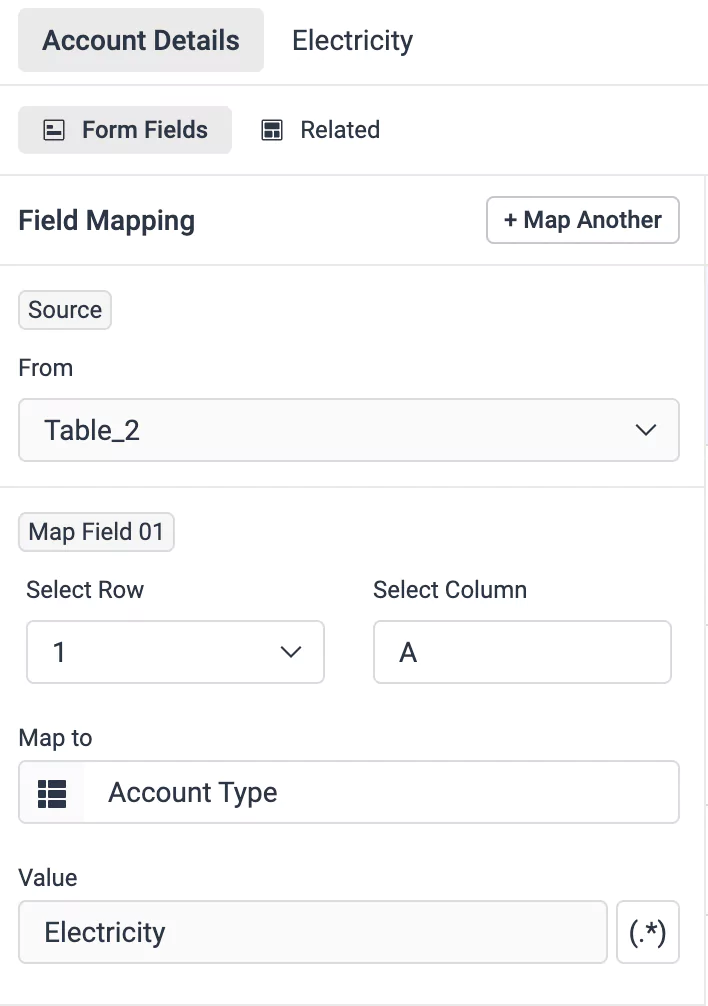
The selected table name is populated in the From field in the Field Mapping section. You can choose to change the default table name to either the value of the first row or the value of the first column.

The application prompts you to choose the Row and Column to identify the cell whose value should be mapped into the application. The Value field is populated with the data found in the cell identified by the selected row and column.
This section provides the capability to map unstructured text that may not be organized into key-value pairs or table formats. By mapping fields from raw text, users can extract specific information that doesn't adhere to predefined structures, offering flexibility in capturing diverse data elements. Here, users can utilize conditions and expressions to extract data fields based on unique patterns or criteria found in the bill. This functionality empowers users to effectively handle complex data extraction requirements and adapt to varying bill formats or layouts.
You must use Regex expression to extract a value from parsed data for mapping it to an application field.
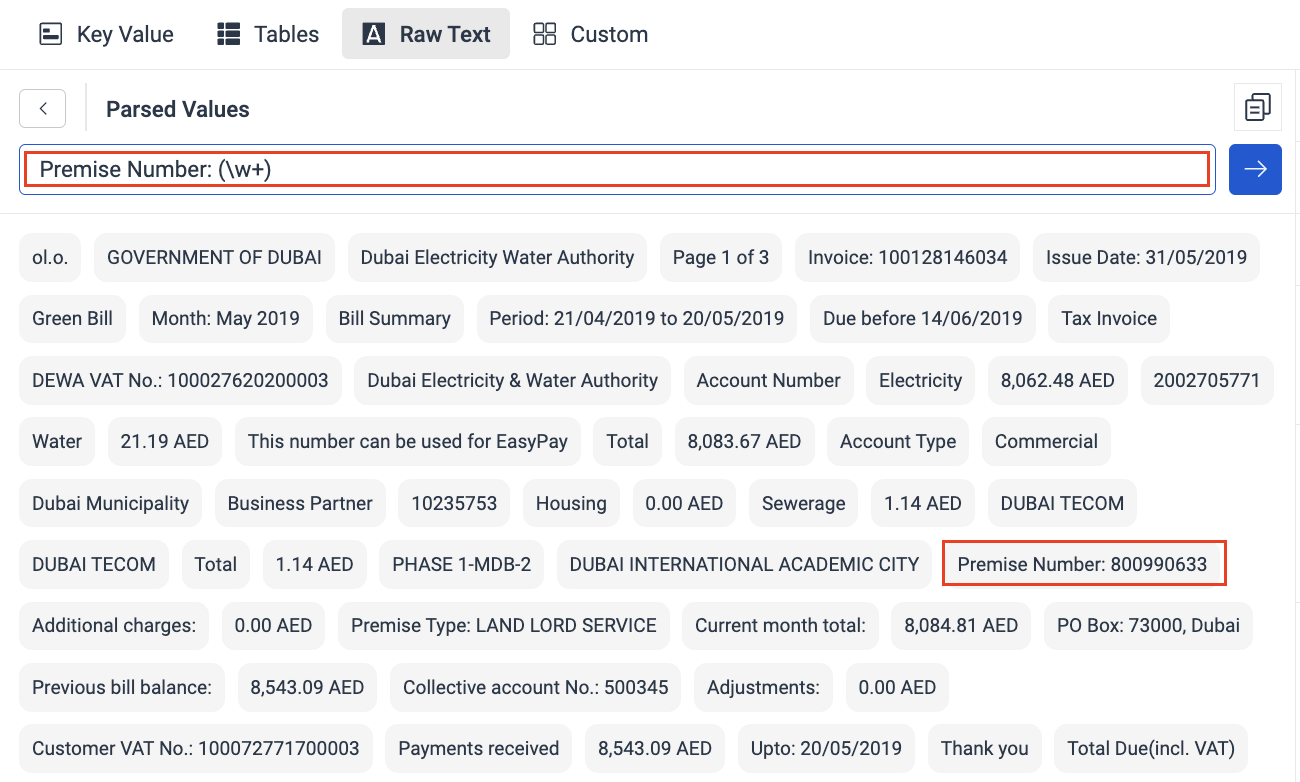
By clicking the
 icon, the output value of the configured expression is populated in the Regex Output Text field in the Field Mapping section, as shown below.
You can use the
 icon to copy the output value of the expression.
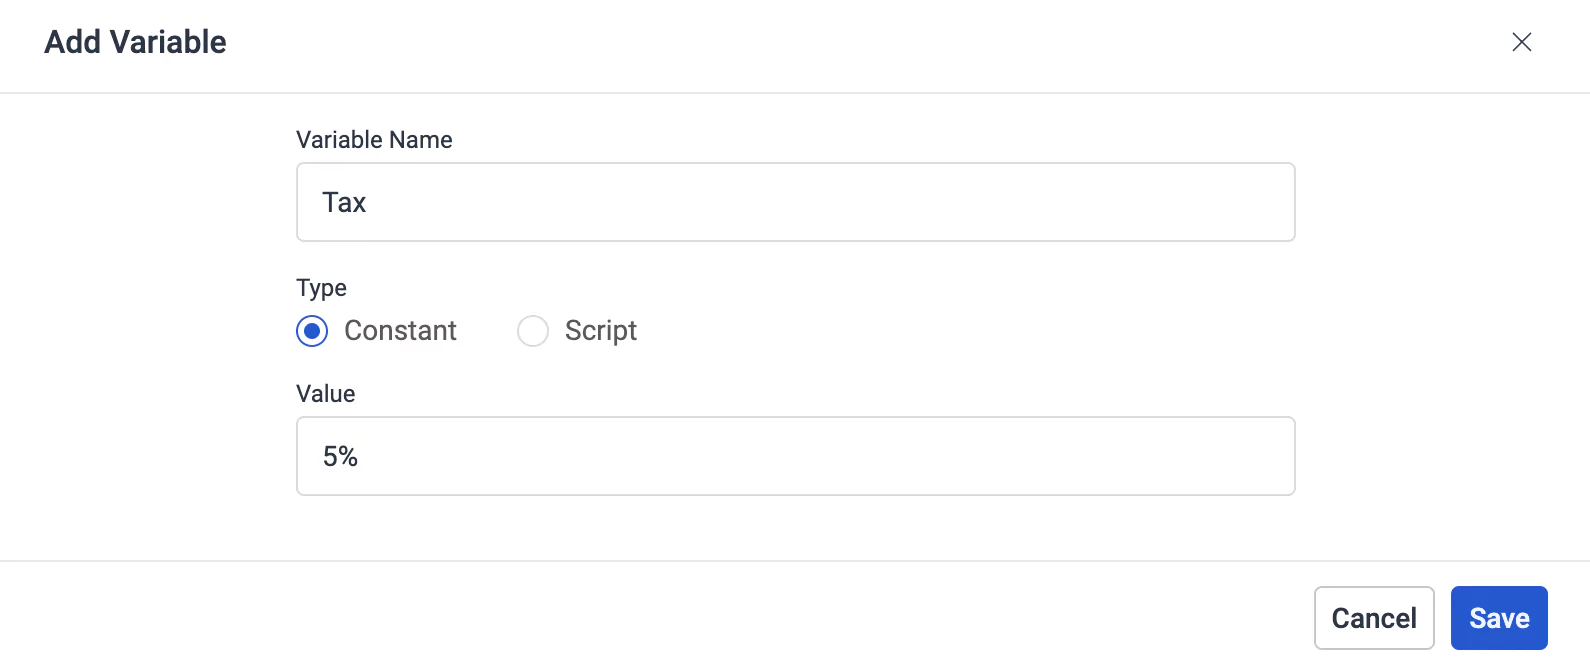
This section empowers users to introduce new details manually that are not present in the bill. Users have the flexibility to define a constant value or write scripts to associate a dynamic value with the newly added variable, offering a tailored approach to data extraction and processing.
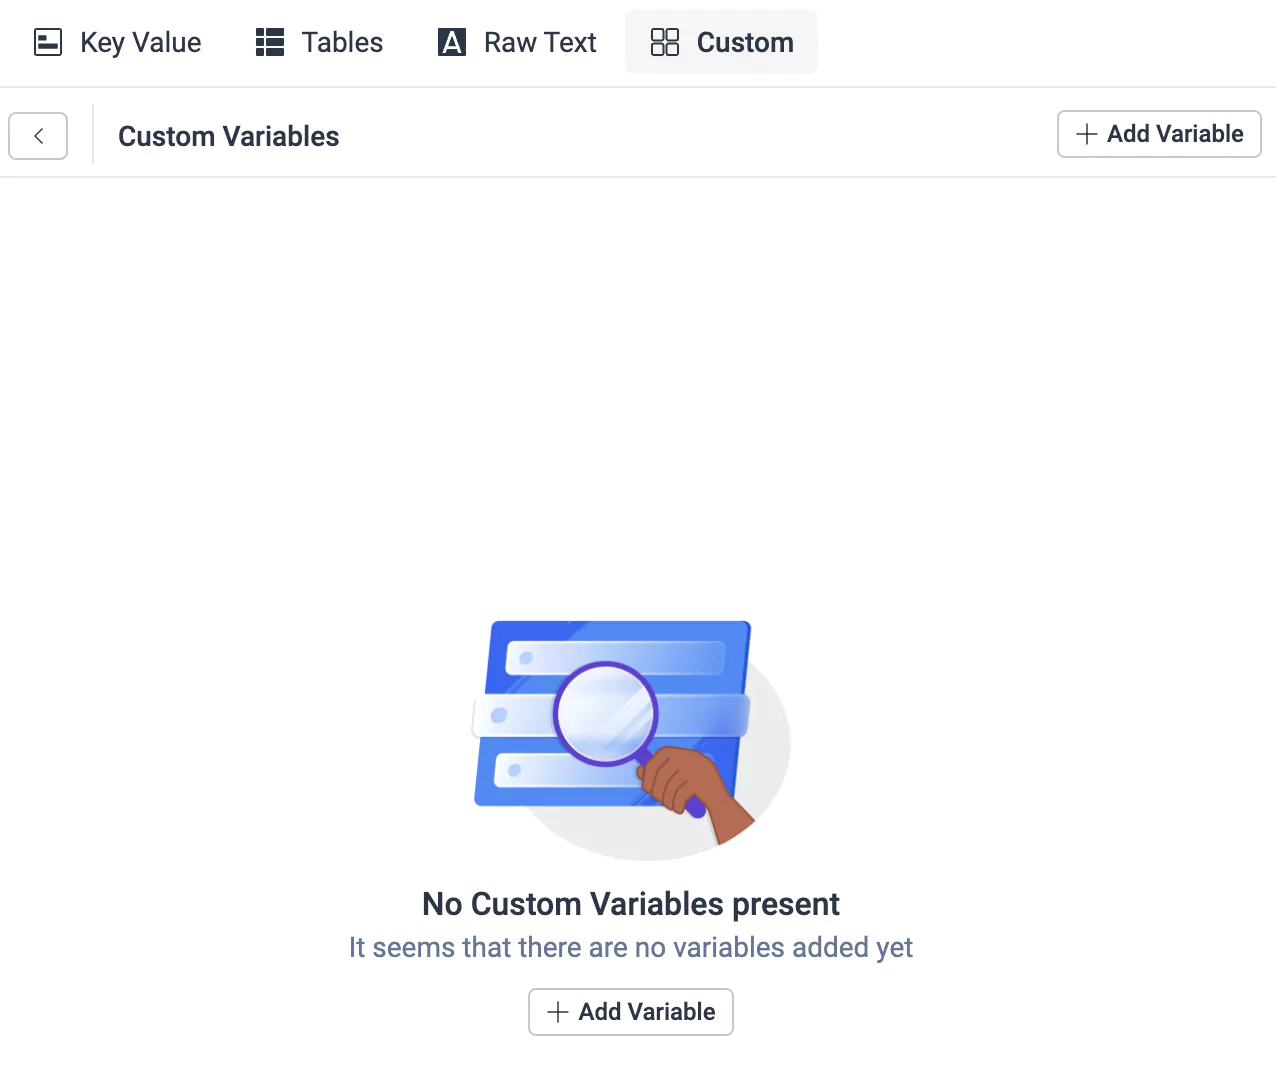
You can use the Add Variable option to add a new field and define its corresponding value, as shown below.
You can select a field from the Custom Variables to map it to an application field.
The selected field name and its corresponding value are populated in the Field Name and Value fields, respectively in the Field Mapping section as shown below.

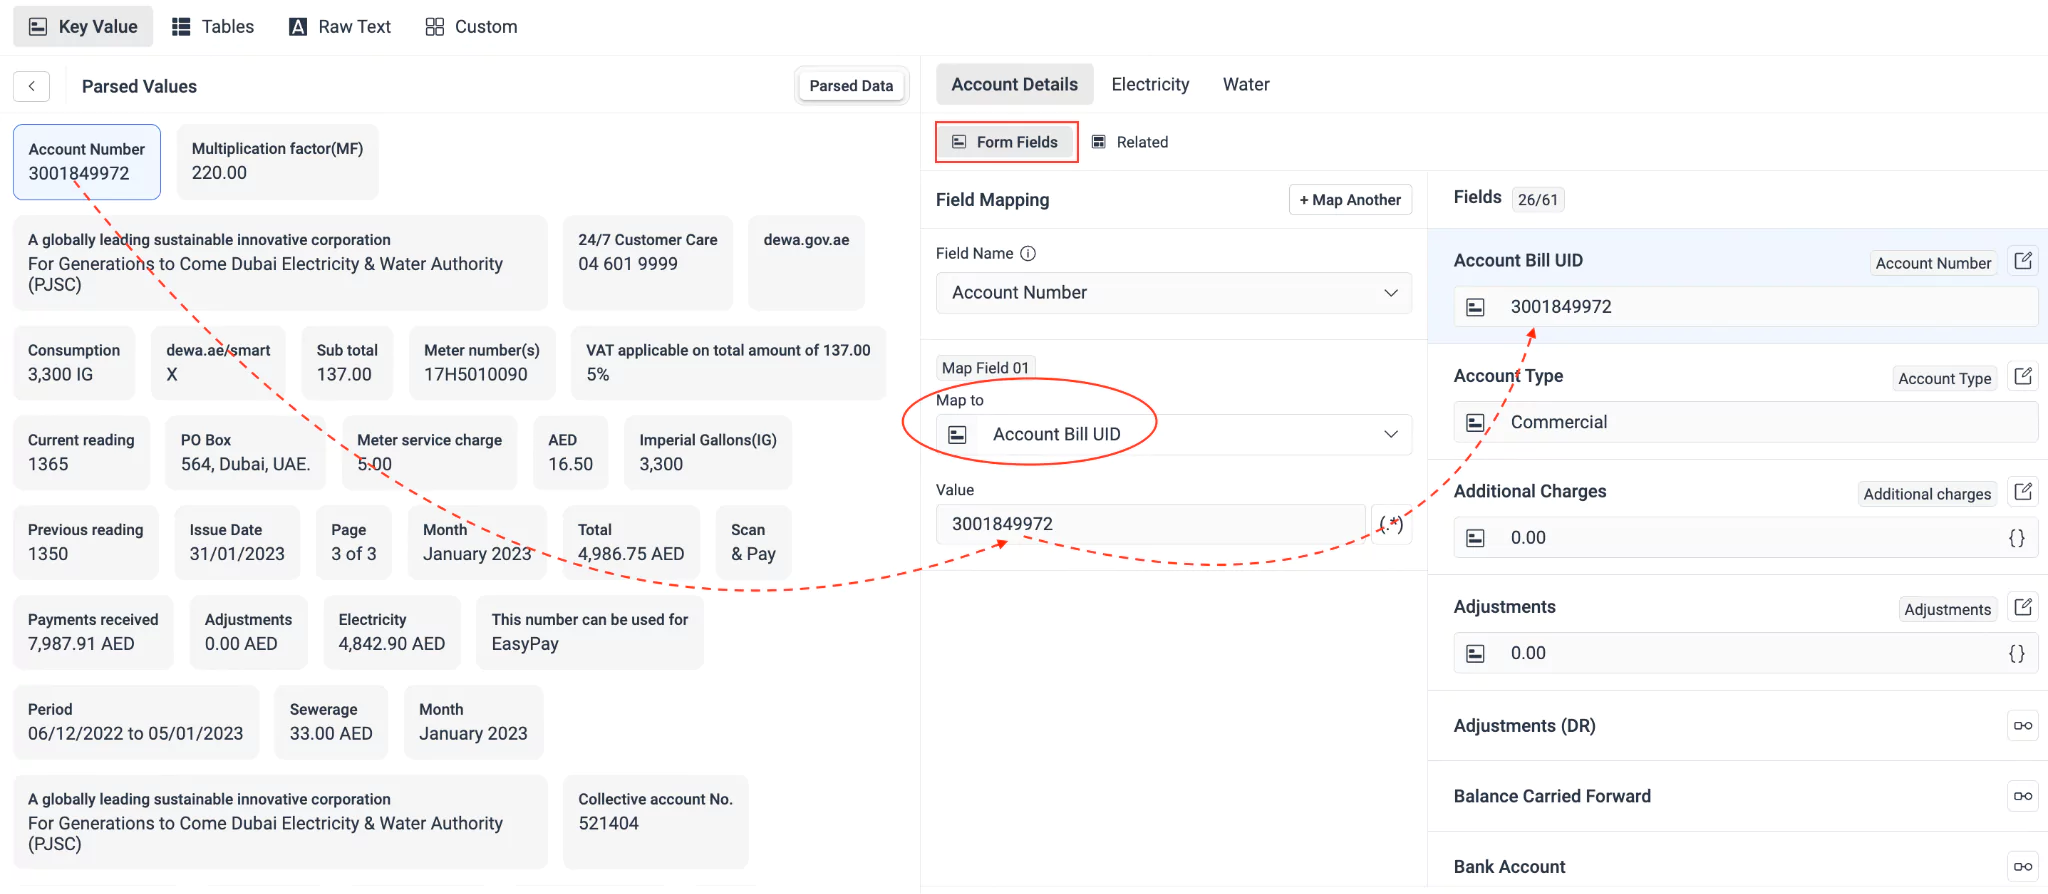
Set the Map to field to the application field where the selected data (field value) should be mapped. You can choose the field value to be mapped to one of the following options:
- Form Field
- Related Field
- Line Item
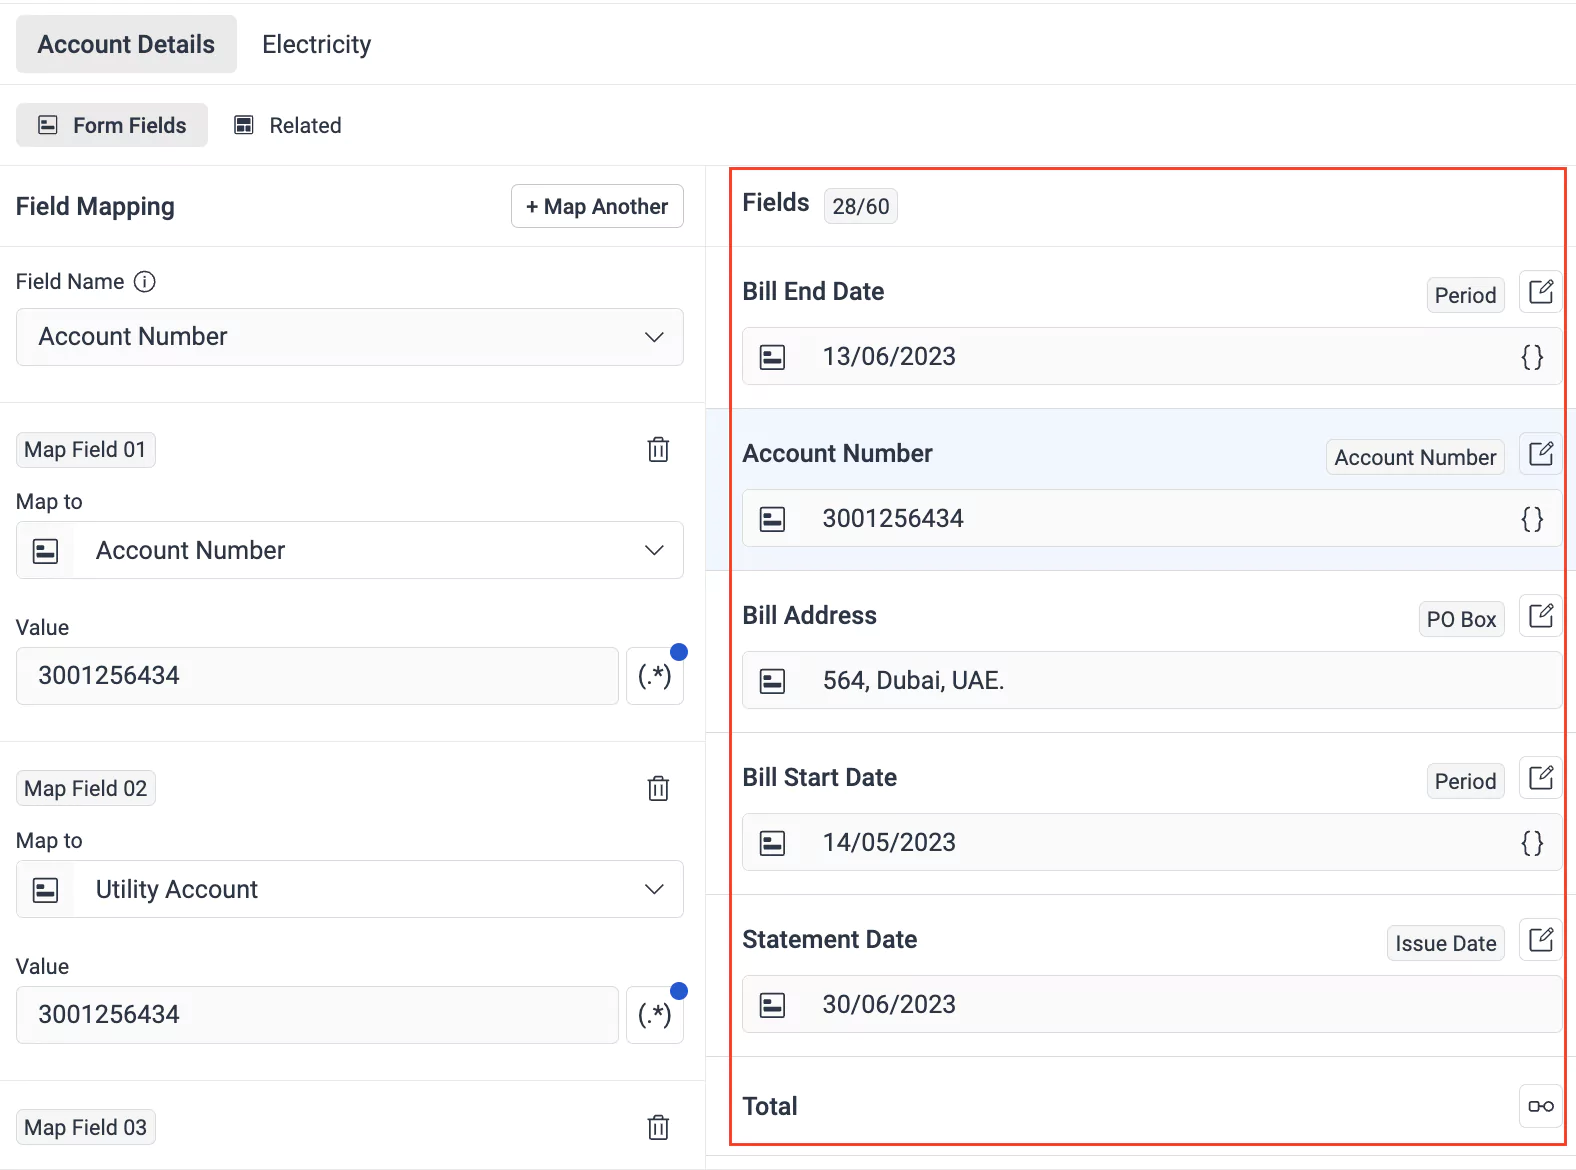
This section allows you to map the selected data (field value) to a specific field within the current module. For example, if you have data extracted from a bill related to customer account number, you can map it to the Account Bill UID field in the current module.
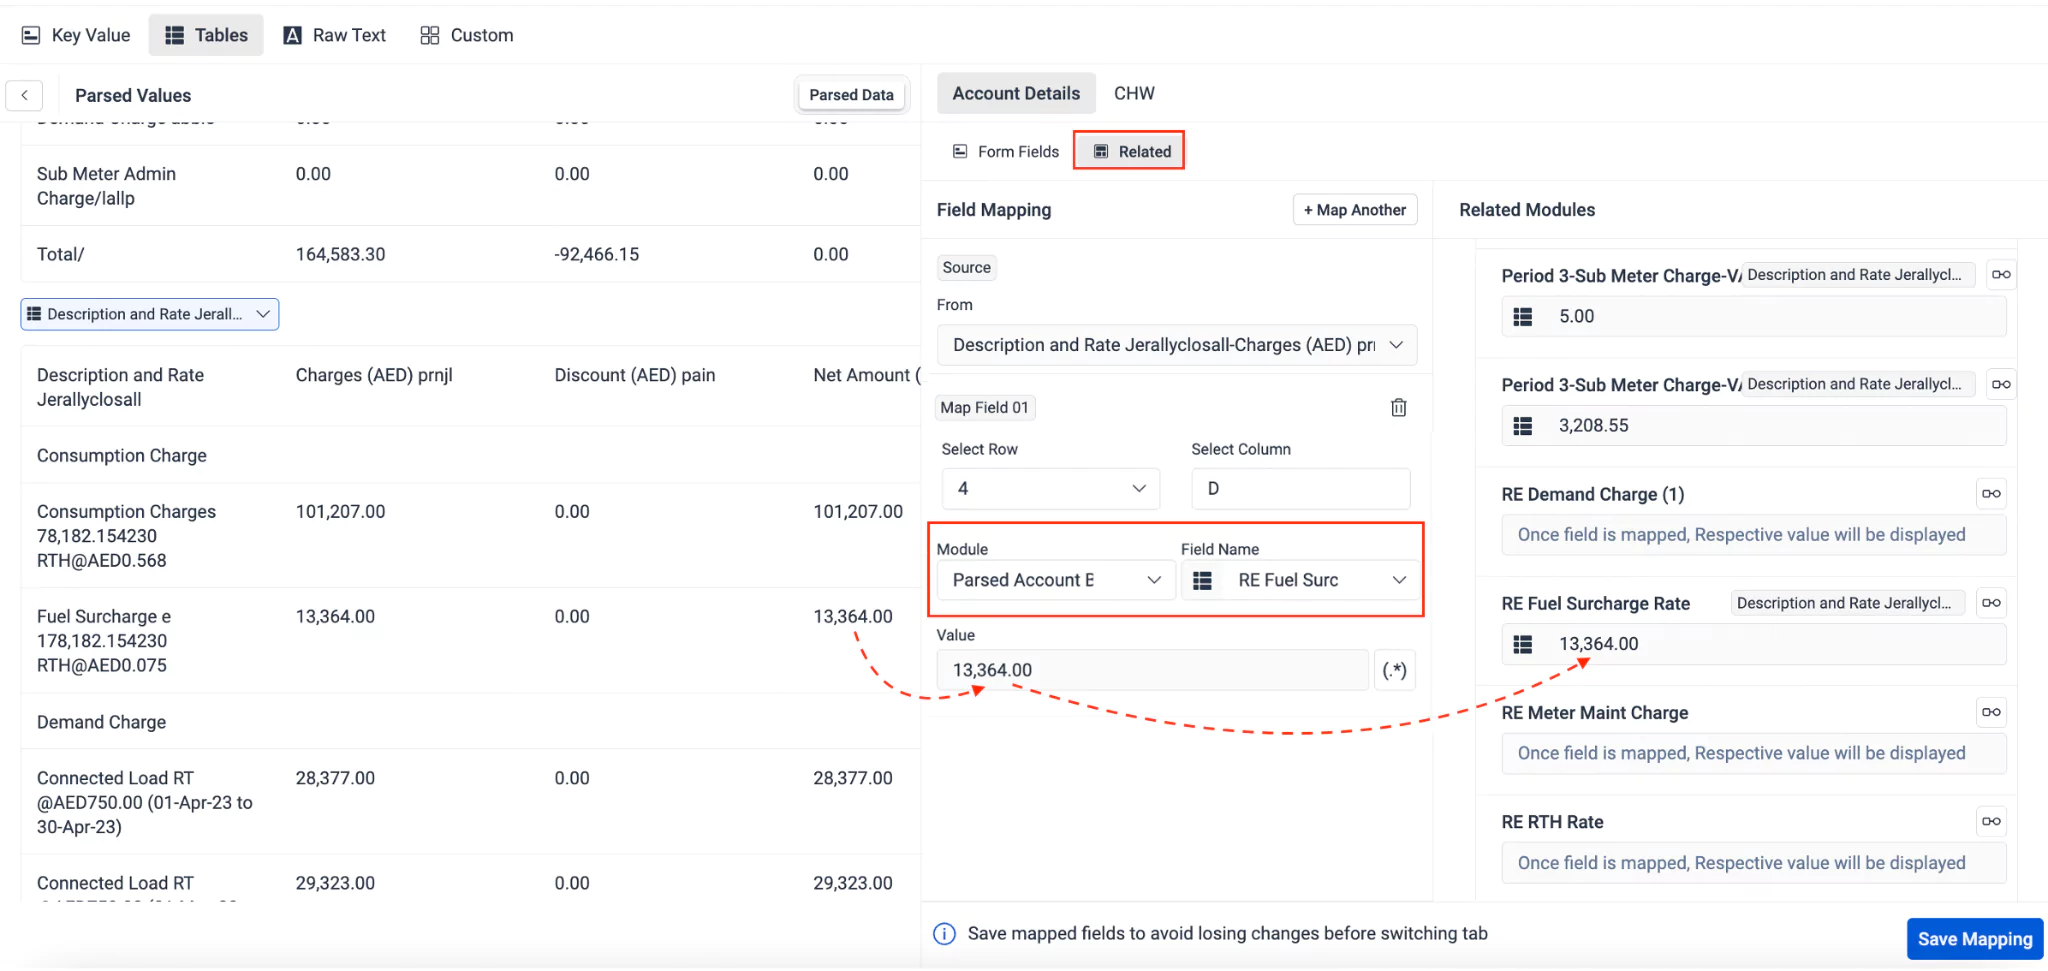
This section enables you to map the selected data to a field associated with a custom module within the application. For example, if you have data extracted from a bill corresponding to fuel surcharge, you can map it to the Fuel Surcharge Rate field in the Parsed Account Bill module.
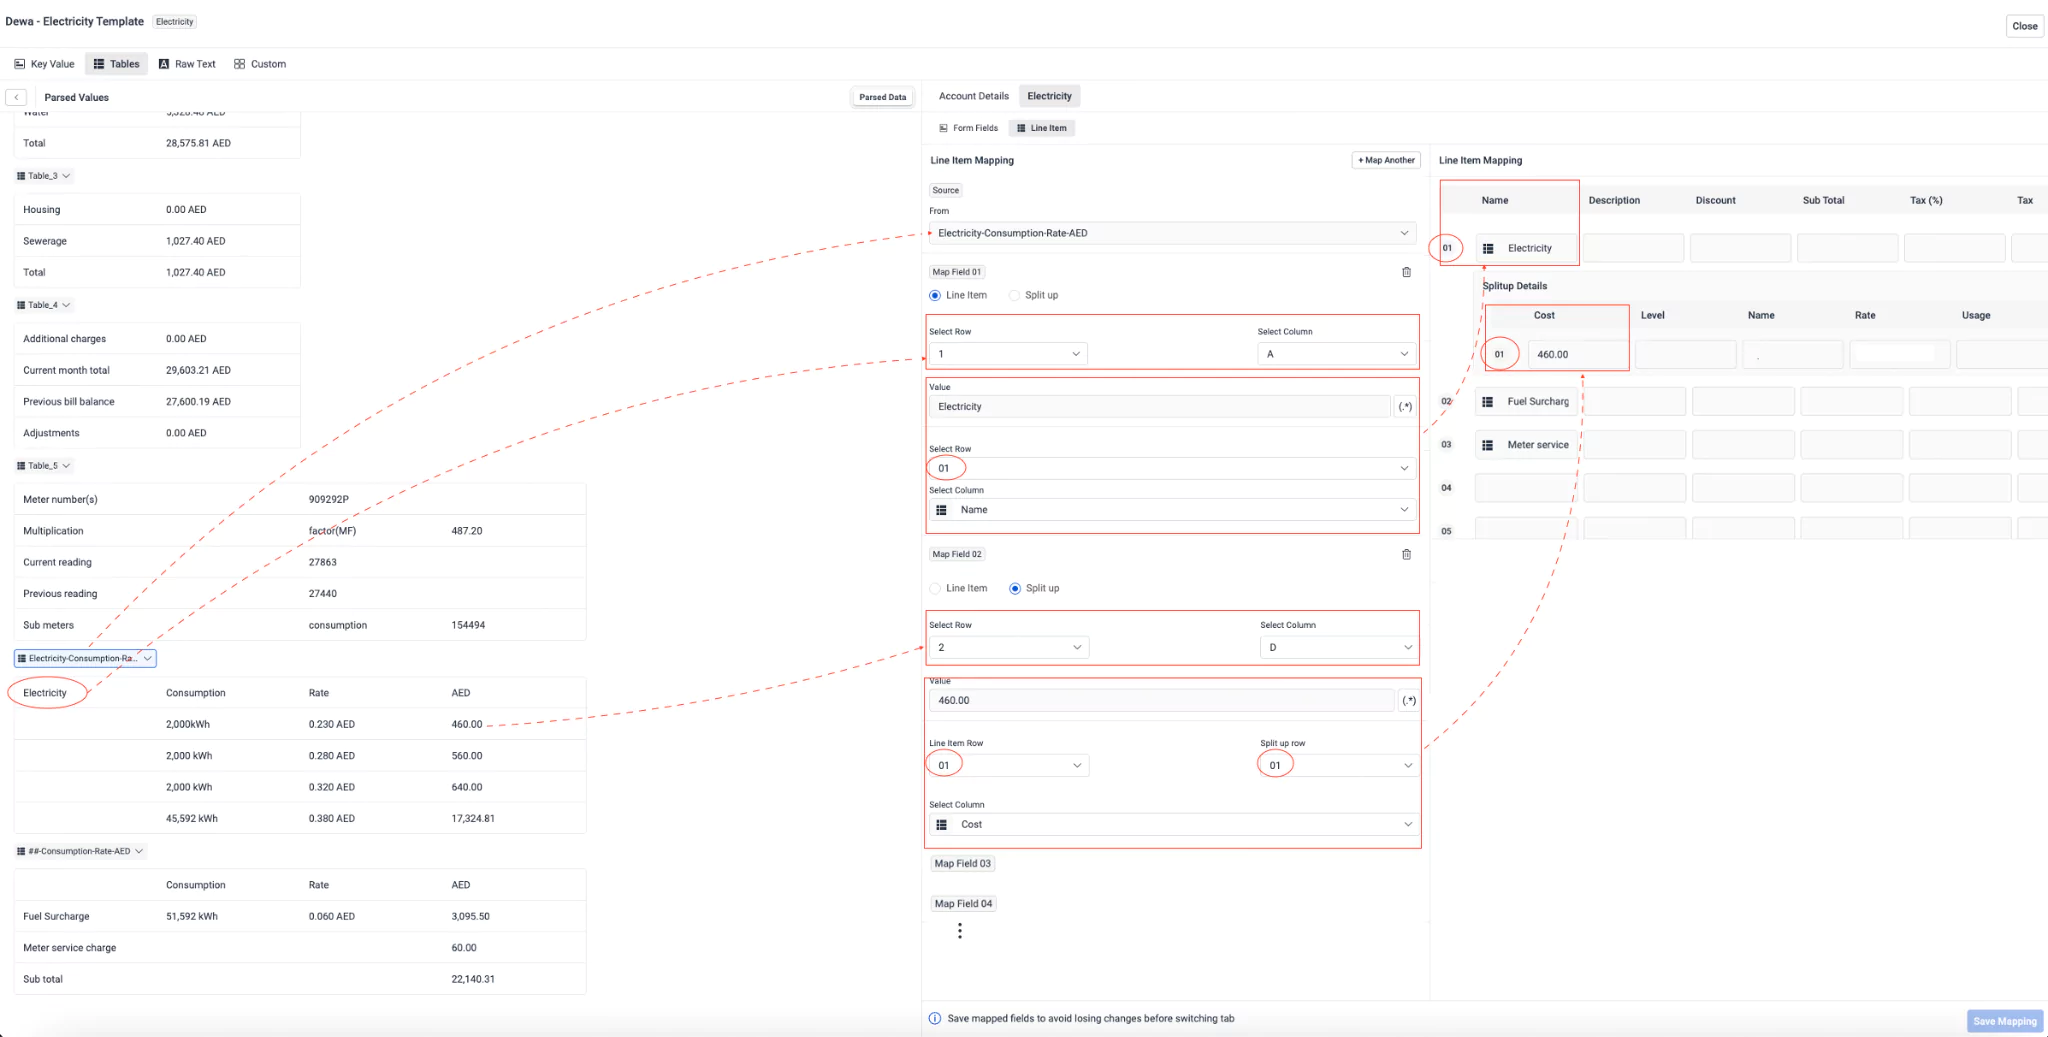
This section allows you to map the selected data to a line item or specific entry within a larger record. For example, if you have data extracted from a bill that represents electricity consumption, you can map it to the corresponding line item for that billing, specifying details such as the item name, discount, or tax percentage.
Additionally, you can utilize this section to include a split-up of expenses, enabling a more granular analysis of the bill and facilitating accurate breakdown of information across various categories or departments.
The mappings configured for form fields, related fields, and line items are utilized to parse the bill data and present it in the list view of the respective sections, either Account Bill or Utility Bill, within the application. Additionally, the mapped details are showcased in the summary screen corresponding to the account or the utility bill. Read the Accessing the Approved Bills section for more information.
Click Save Mapping. The configured field mappings are now successfully saved.
Click Close at the top right to return to the Bill Parser screen.
You may also consider the following pointers when configuring field mapping. You can,
Configure the field mappings individually for each utility type, such as Water, Electricity, and others, by navigating to the corresponding sections.
Use the +Map Another link to map the selected field value to one more application field.
Use a regular expression (regex) to modify any extracted value from the bill in order to align it with the existing application field during mapping. Read the Configuring Regex Expression section for more information.
Map a selected field value to multiple application fields. However, mapping an application field to multiple values is not supported. If attempted, the application field will only retain the last field value mapped to it.
View the summary of sample values extracted from the bill, mapped to each application field, in the right panel, as shown below.
Configuring Regex Expression
Regex expressions find their application in setting up rules within an OCR system to specify patterns for accurately identifying and extracting data from utility bills. Regular expressions are powerful tools that enable users to define complex search patterns, allowing the OCR system to recognize and capture specific types of information, such as account numbers, names, or addresses, with precision. By configuring regex expressions as part of field mapping, users can tailor the data extraction process to suit the unique formatting and variations present in different types of utility bills. This ensures greater accuracy and reliability in extracting data, even when faced with diverse bill formats or layouts.
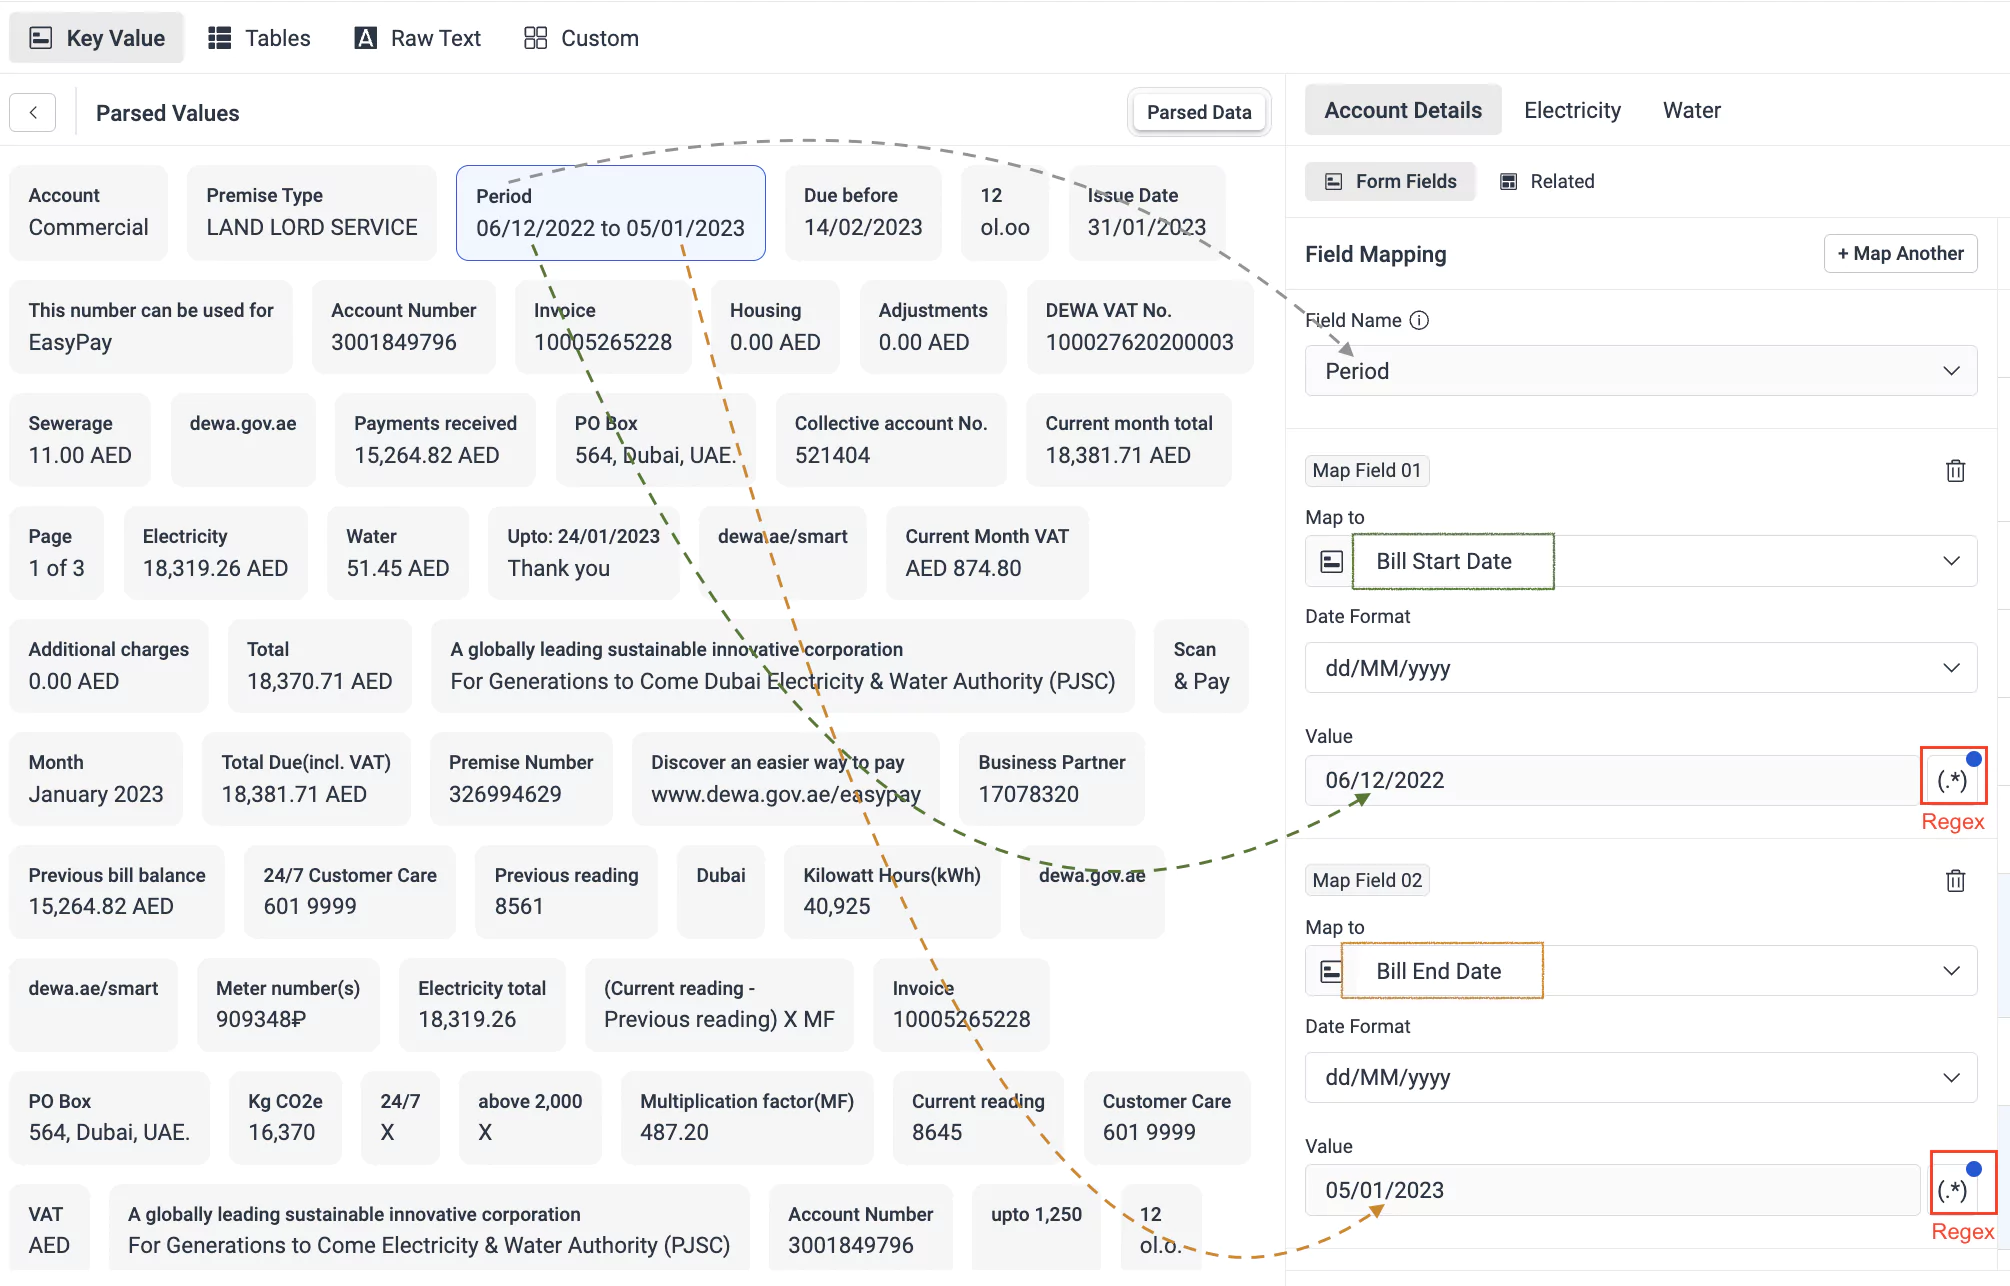
Let's consider a use case where the duration mentioned in a bill needs to be mapped to relevant "from" and "to" fields in the application.
The following procedure illustrates how a regex expression can be used to extract the "from" and "to" dates from the duration separately and map them to two different fields.
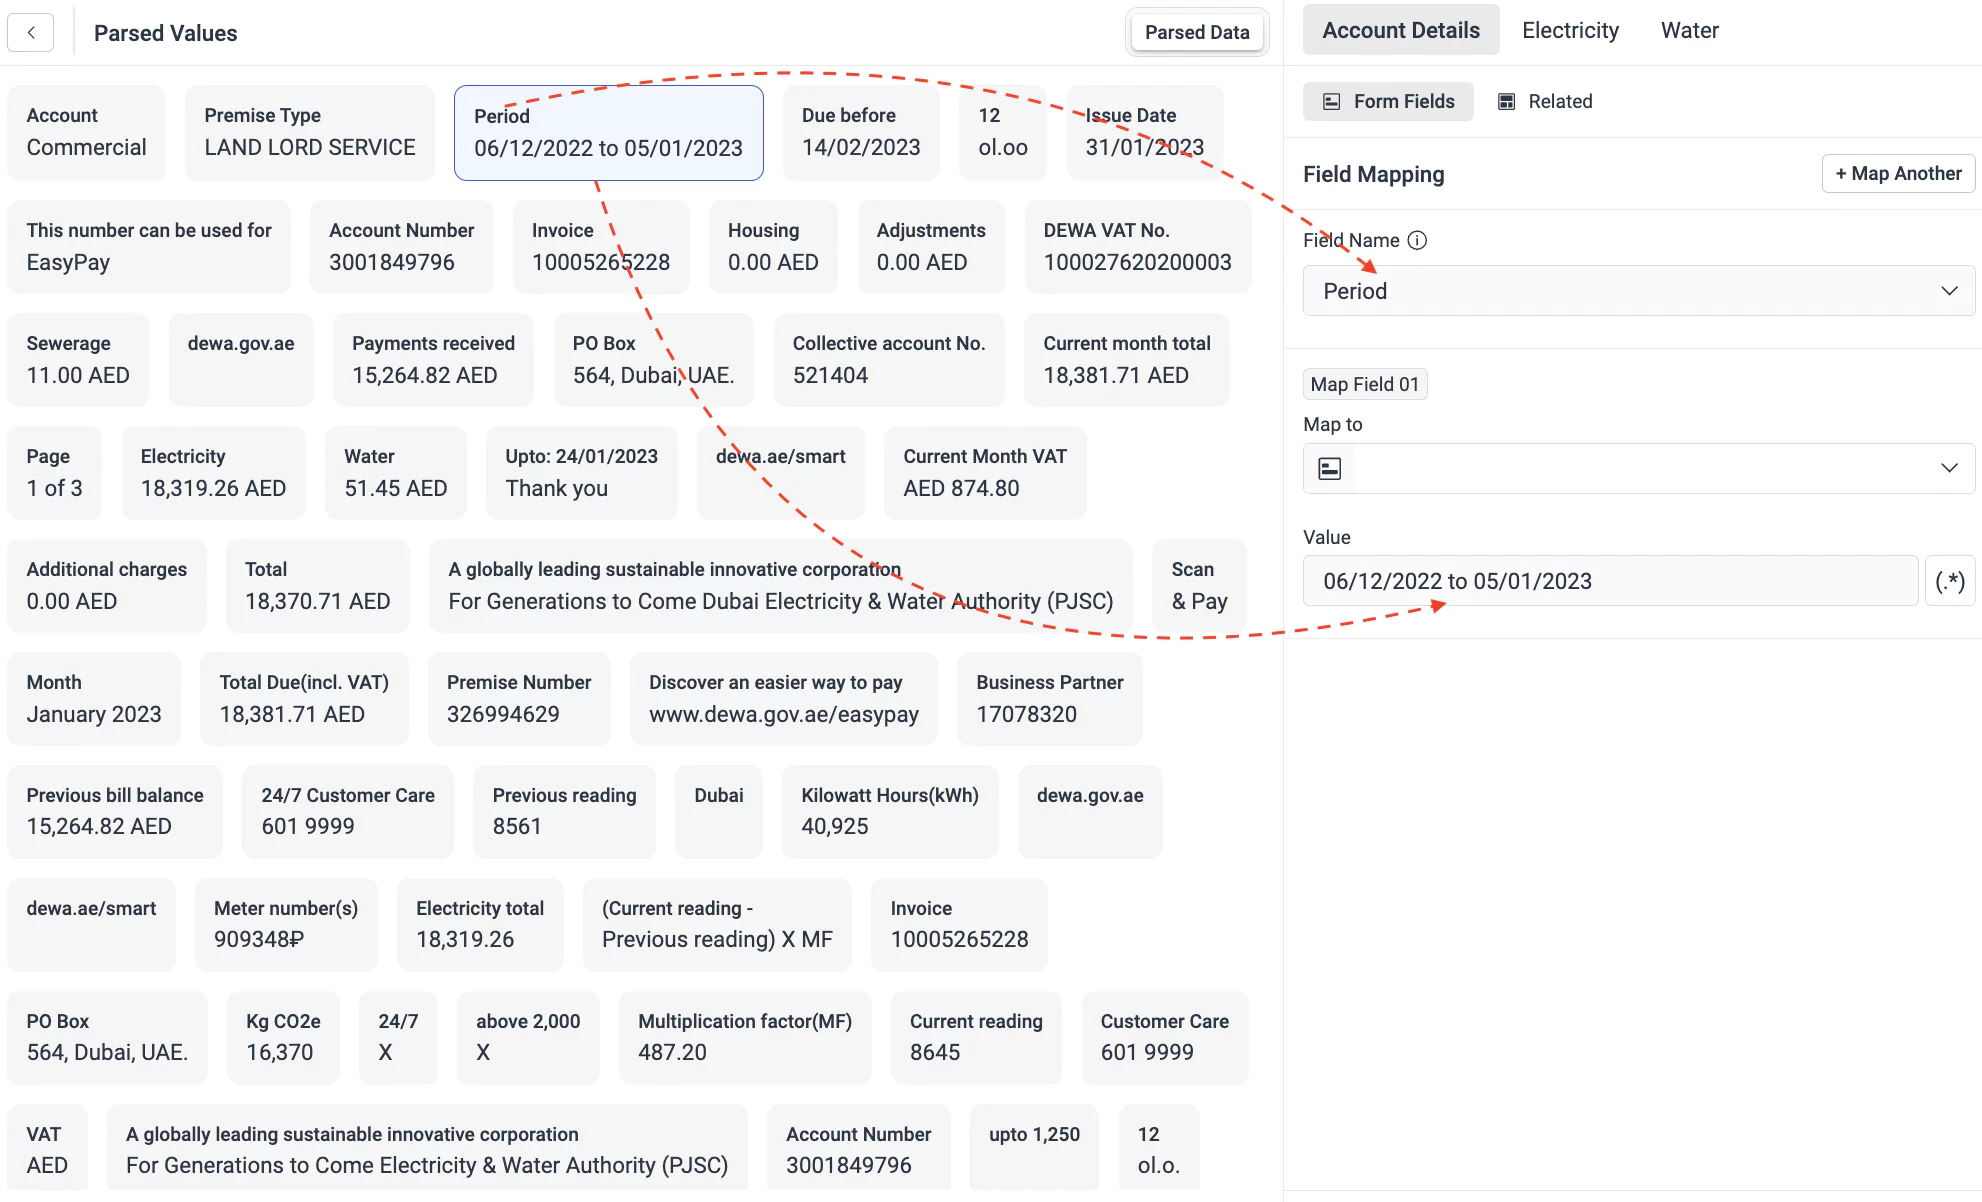
Select the required duration field (Period) from the Key Value or Tables section. The Field Name and Value fields are updated in the Field Mapping section, as shown below.
Click the
 icon corresponding to the Value field. The Regex configuration screen appears.
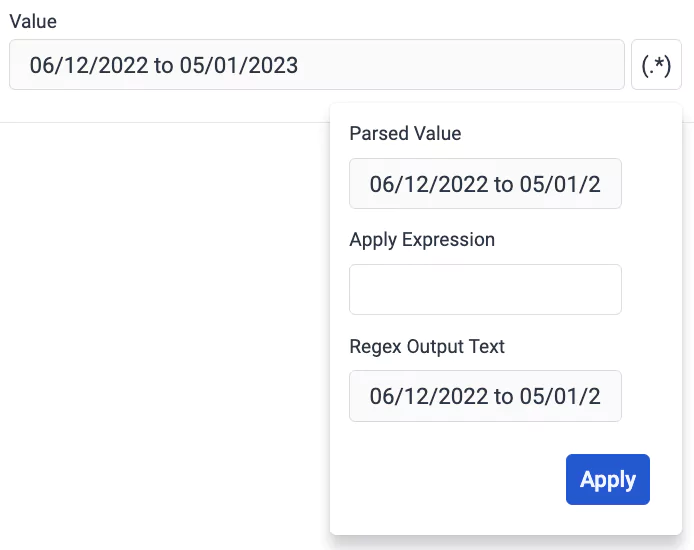
Enter the following expression in the Apply Expression field and click Apply.
(\d{1,2}/\d{1,2}/\d{4})
The output value is updated in the Field Mapping section as shown below.
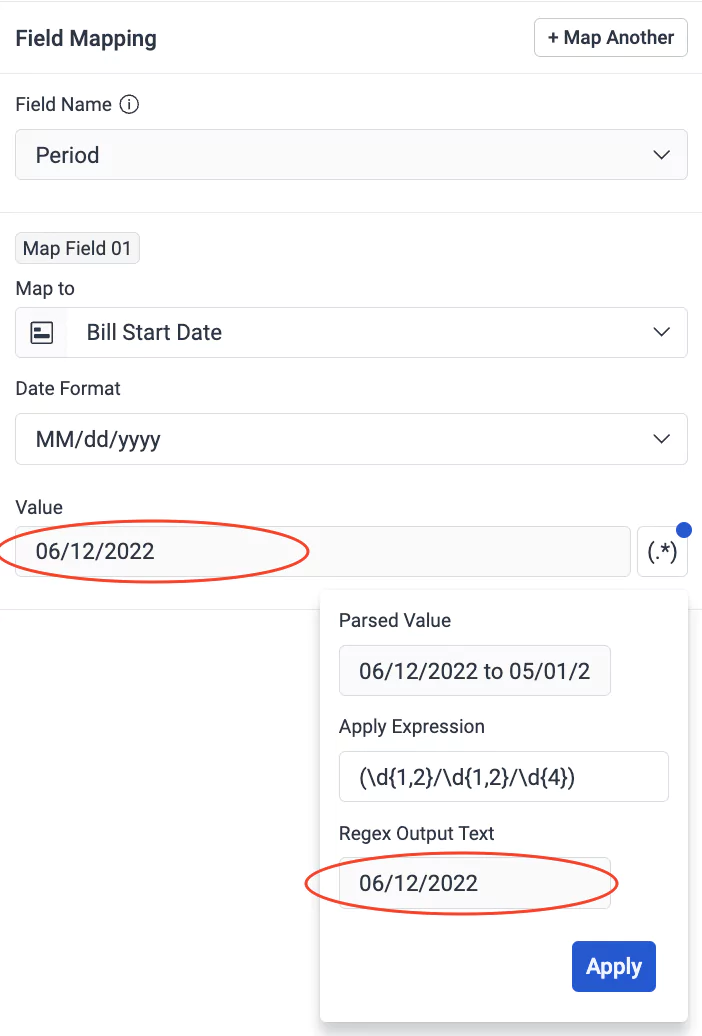
Set the Map to field to Bill Start Date.
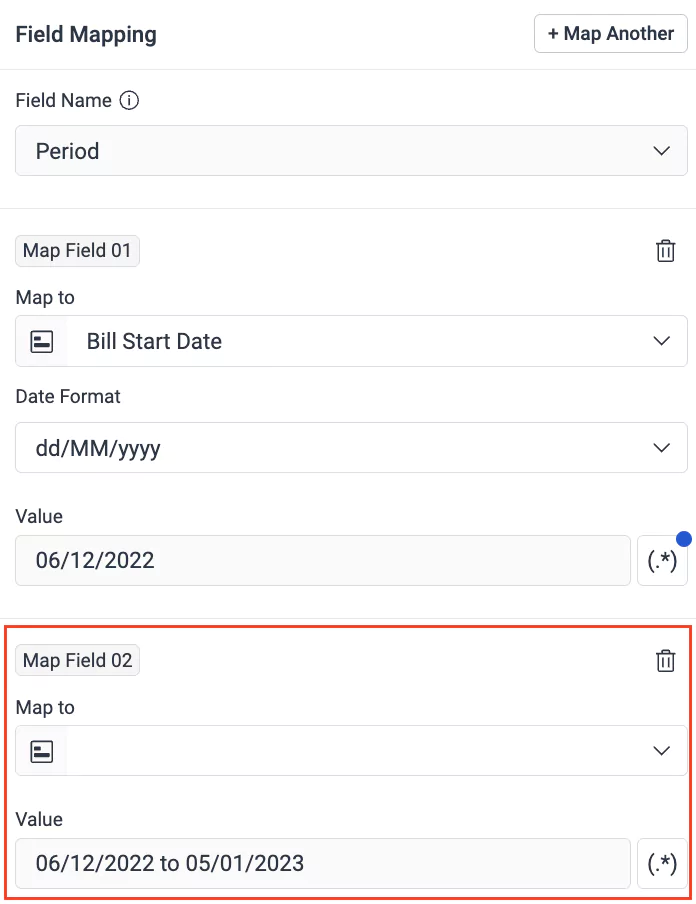
Click on Map Another to reveal an additional set of fields for configuring mapping for Map Field 02, as shown below.
Click the
icon corresponding to the Value field of Map Field 02. The Regex configuration screen appears.Enter the following expression in the Apply Expression field and click Apply.
(\d{1,2}/\d{1,2}/\d{2,4}\$)
The output value is updated in the Field Mapping section, as shown below.
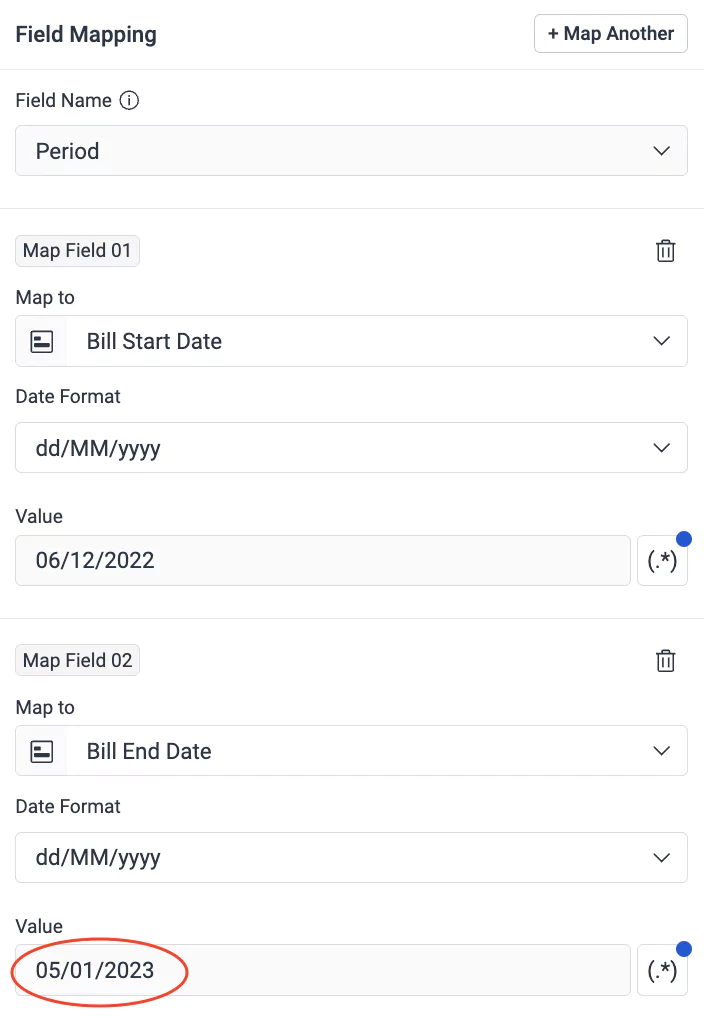
Set the Map to field to Bill End Date.
Note: You can use the options available in the Date Format field to switch between different date formats. To remove the unwanted field mapping sections you can use the icon corresponding to it.
 Click Save Mapping. The From and To dates specified as the Period in the bill will now be extracted individually and mapped to the Bill Start Date and Bill End Date fields in the application.
Once the parsing logic is configured, you can start uploading the bills from which details need to be extracted and mapped into the application. You can use the Upload Bill button to upload a bill directly from this section.