Configuring Questionaire with Q&A Builder
A questionnaire helps to capture accurate, appropriate, and complete information and address your business objective with valid and reliable questions. Once a survey template is created, you can configure the questionnaire for the respective template with the help of a Q&A BUILDER. To explore the builder, click on the survey template. The respective QA builder screen appears as shown below:
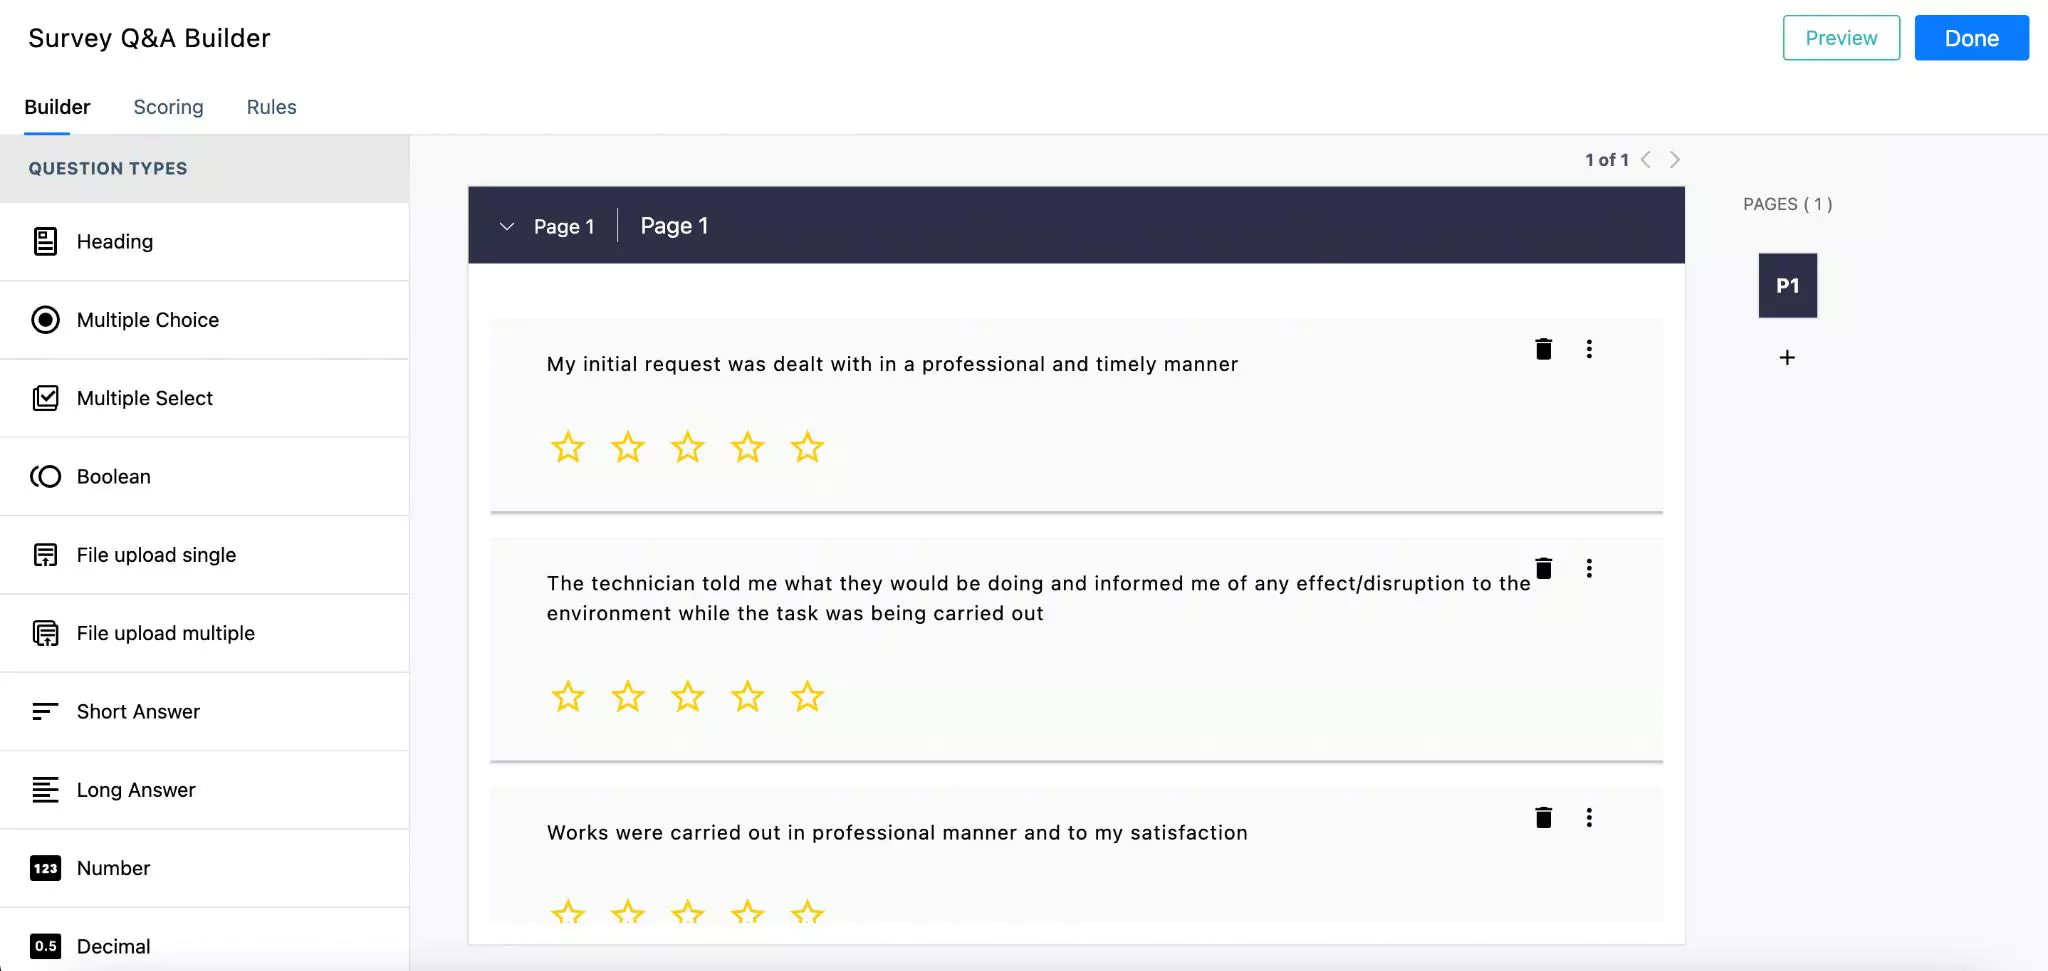
The upcoming sections cover the various sections involved in configuring the questionnaire for a survey template.
Customizing Builder
Builder helps you to create a questionnaire supporting various types of Question and Answer formats. You can drag and drop any of the following field types into the template or form:
Headings - To create a heading for the survey questionnaire.
Multiple Choice - To add a question with multiple choices of answers with a radio button associated to each of them, for selection.
Note: The survey taken by a user can select only one option out of the available choices.Multiple Select - To add a question with multiple choices of answers with a checkbox associated with each of them for selection.
Note: The survey taken by a user can select more than one option out of the available choices.Boolean - To create a question with a Yes or No answer.
File Upload Single - To insert a question with a provision to upload an attachment as an answer.
File Upload Multiple - To insert a question with a provision to upload multiple attachments as an answer.
Short Answer - To create a question with a text box of 255 characters limit to capture the answer.
Long Answer - To add a question with a text box of 2000 characters limit to record the answer.
Number - To insert a question with a numerical input field to capture the whole numbers (like 3,33,333,3333, and so on) as response.
Decimal - To create a question with a numeral input field to capture the decimal numbers (such as 5.5, 0.001, and so on) as answers.
Date/Time - To create a question with a date and time field to record a timestamp as a response.
Star Rating - To add a question with a rating dialog, where the opinion can be expressed in stars (for example, 1/5 for awful experience).
Emoji Rating - To add a question with a rating dialog, where the opinion can be registered as emojis (for example, ' 😃' for excellent experience).
Matrix - To create a question with a provision to enter the answer in a table format.
Multi Question - To club and insert multiple questions in table format, where the responses can be recorded in the adjacent column.
Note: When a question is answered the next question is executed depending on the previous answer.
Let us consider a sample configuration to create a survey questionnaire with an appropriate heading and a question that records a boolean response. To create the questionnaires,
Drag and drop the Heading field from the QUESTION TYPES section into the questionnaire creation page. The following screen appears to configure further details.
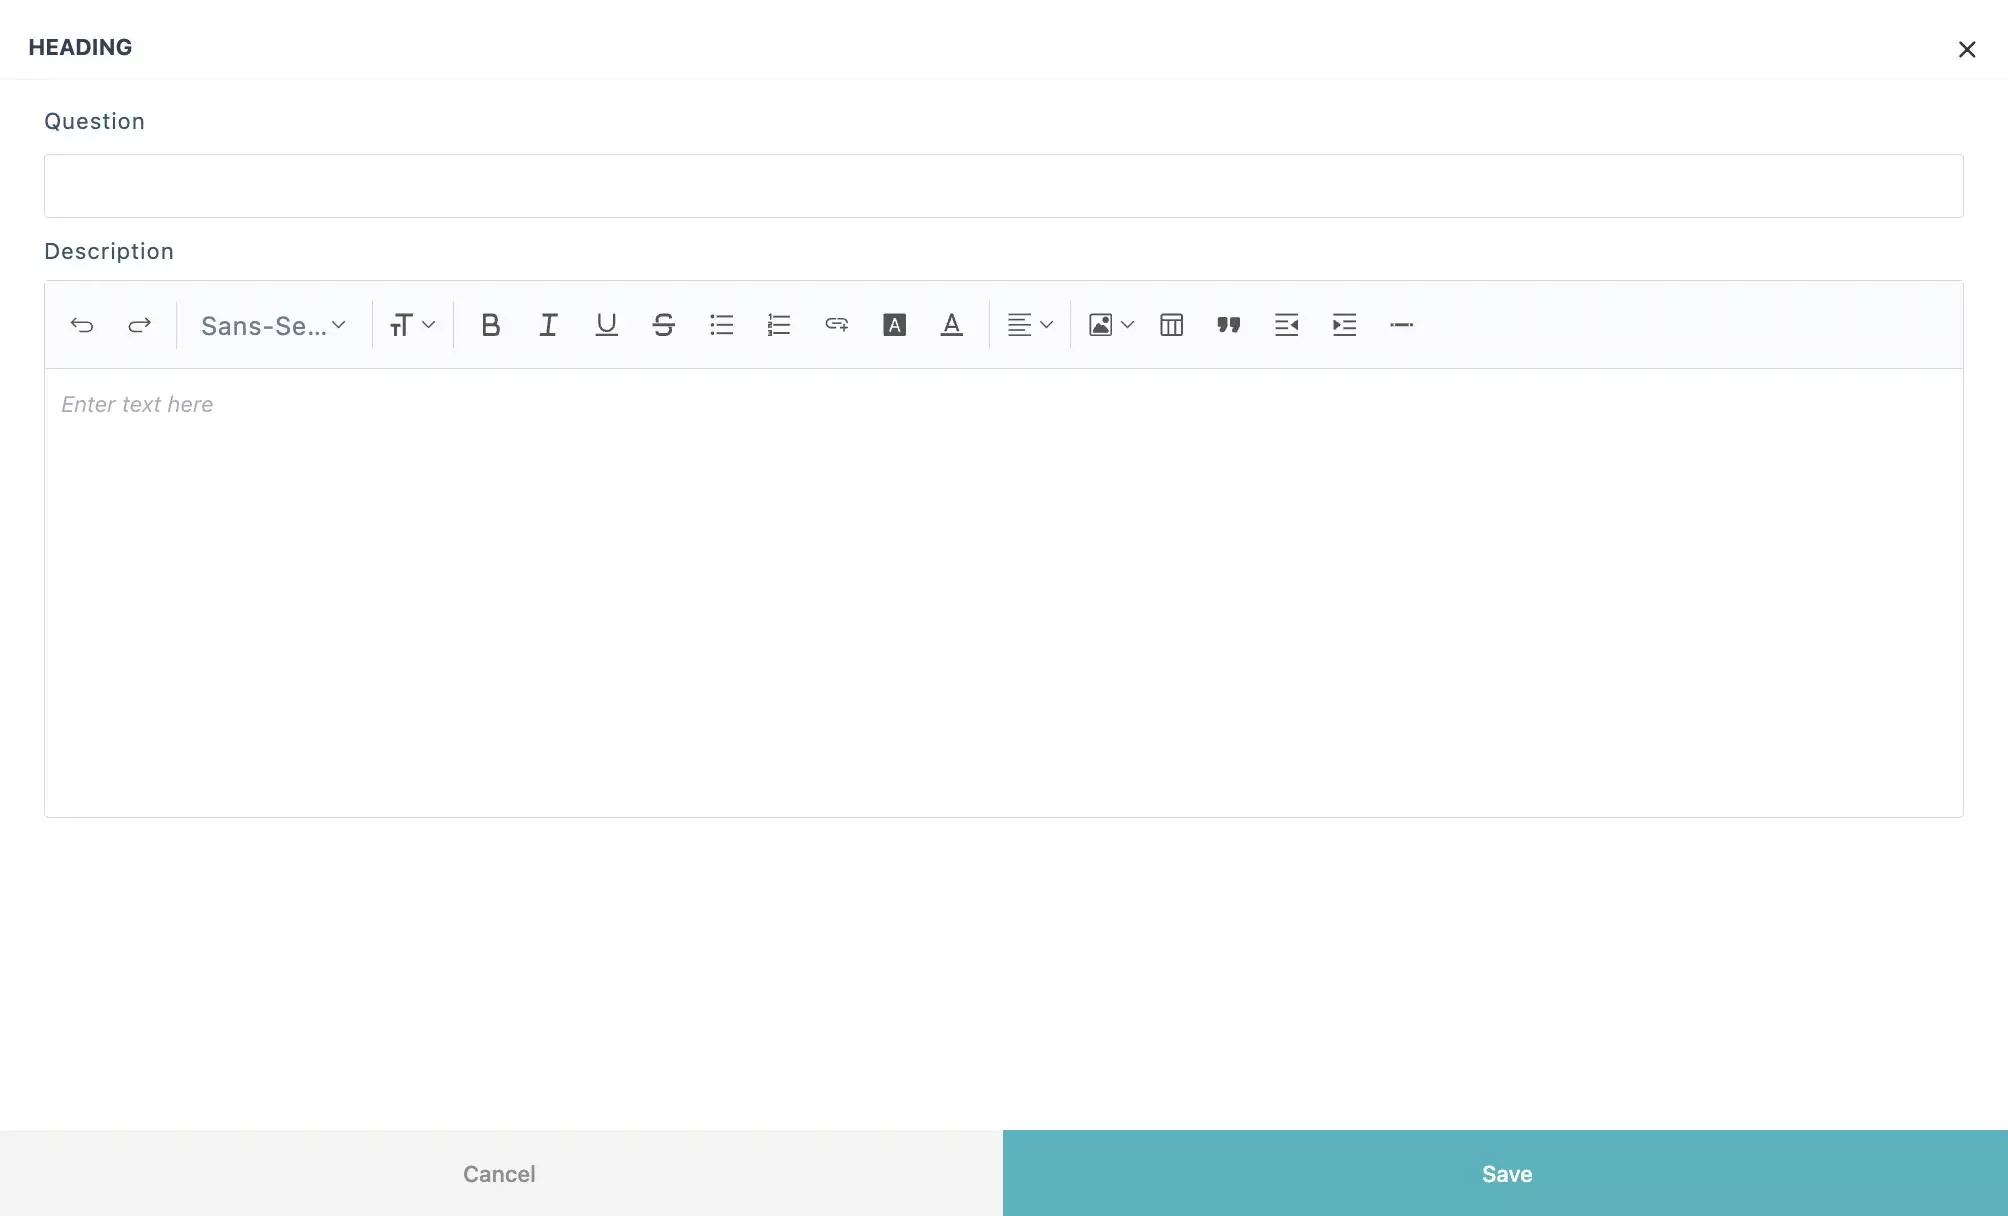
Enter a relevant heading and description for the respective questionnaire and click Save.
Now, drag and drop the Boolean field from the QUESTION TYPES section into the same page.
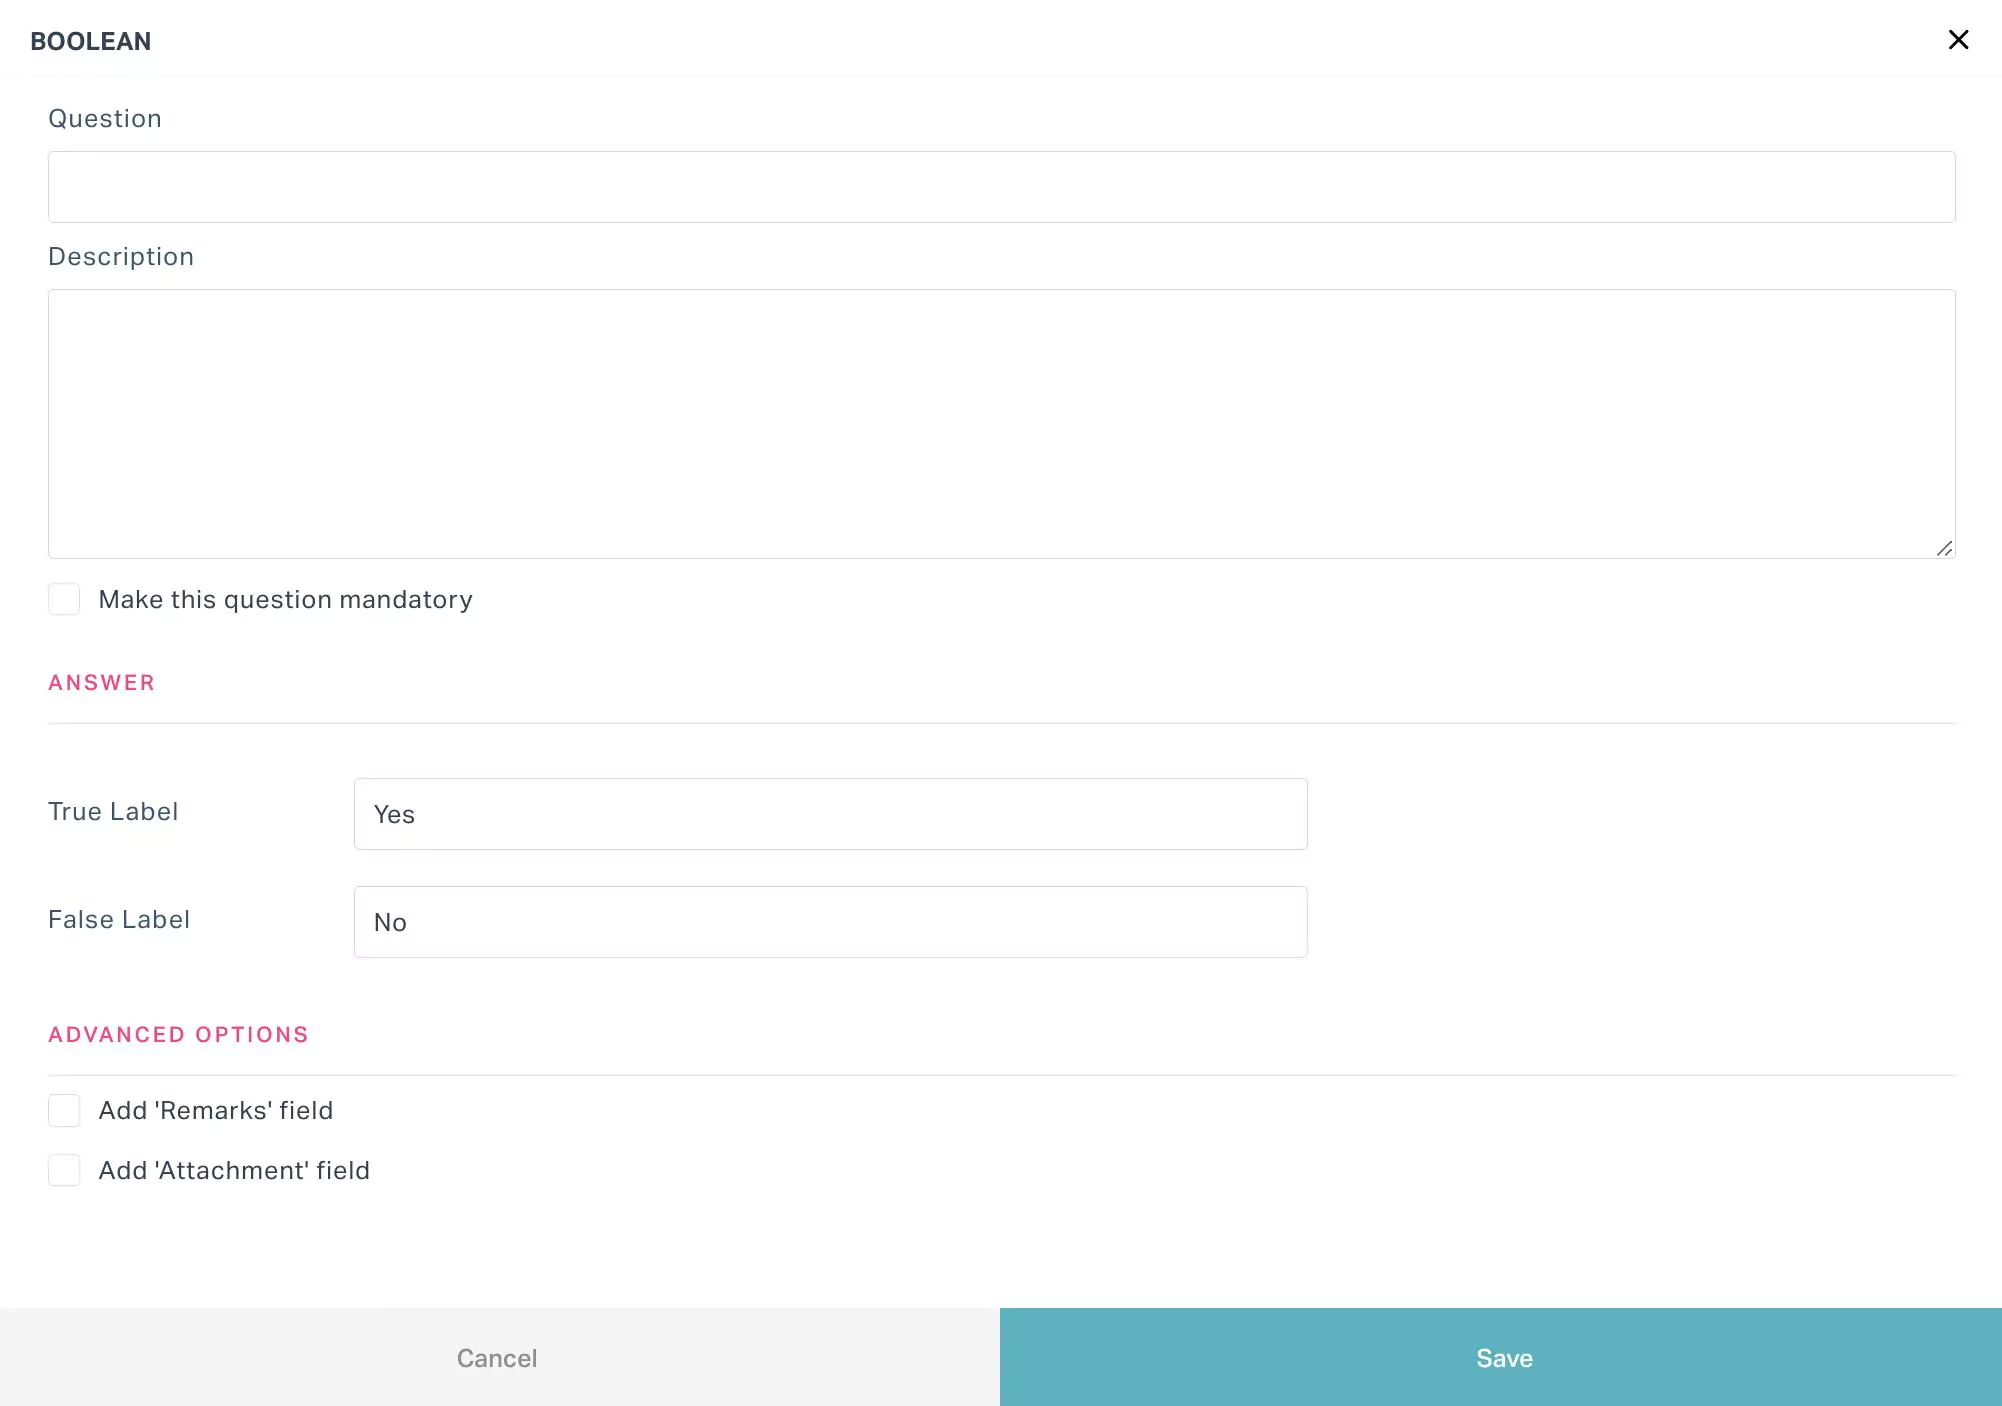 Note: The fields to configure the details of the question differ based on the selected question type.
Update the following fields in the screen above:
Question - Specify the questionnaire item to which the user taking the survey must respond based on the survey carried out
Description - Provide a short note explaining why the question is added to the questionnaire
Make this question mandatory - Enable this field, if the expected information is crucial and the inspector should not skip answering
Answer -Specify the options that let the inspector choose whether the statement is True or False (for example, 'Yes' and 'No')
Advanced Options -Enable the corresponding fields to allow the user taking the survey to add remarks and attachments, respectively.
Click Save. The question is now successfully saved. Similarly, you can add more items to the questionnaire, as required.
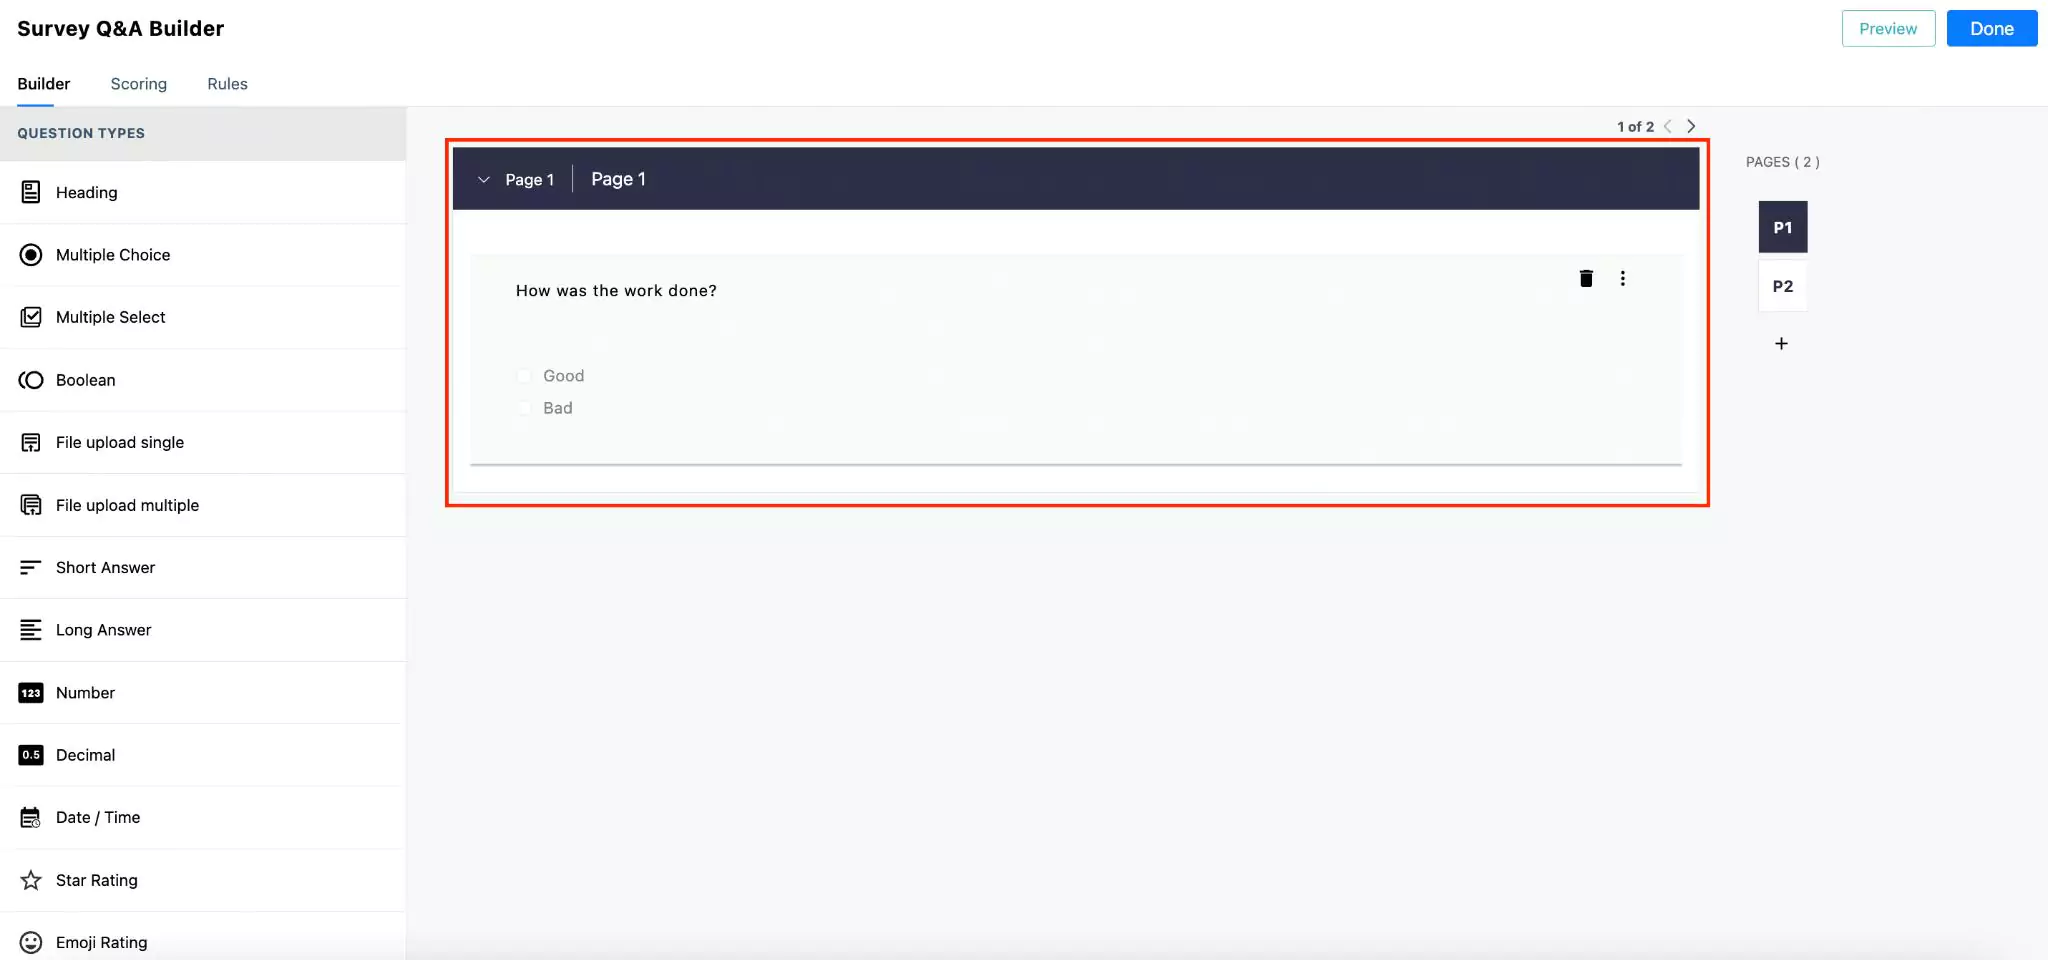
You can also add more pages by clicking on the (Plus) icon on the builder screen.
There are certain functionalities and icons associated with this section that facilitate various activities over the configured questions and organized pages.
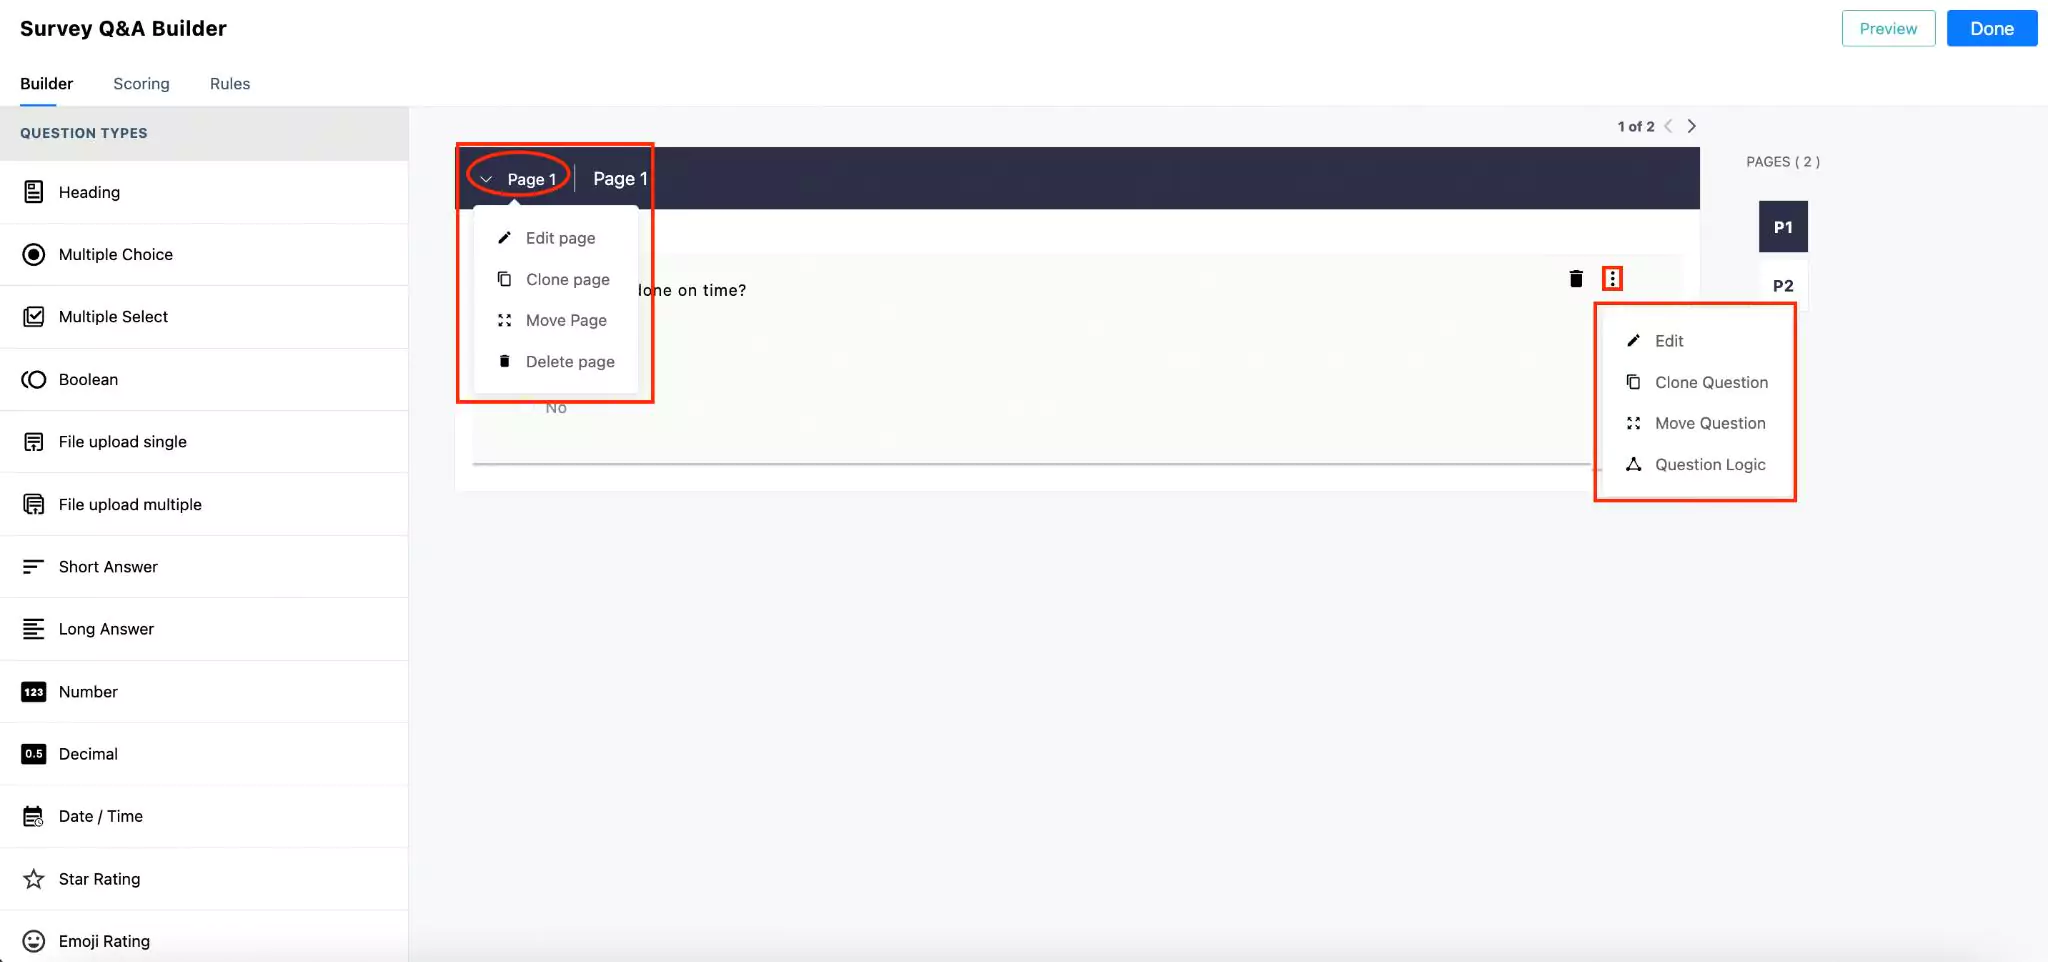
They are,
| Option Type | Icon | Action/Description |
|---|---|---|
| Page | Used to edit page title and description | |
| Used to create an exact copy of the selected page | ||
| Used to reposition the existing page | ||
| Question | Used to modify the question | |
| Used to replicate the question | ||
| Used to change the position of the question Note: You can also move the question from the existing page to another | ||
| Used to hide or enable the display of a question in the questioner |
You can use the (Delete) icon corresponding to a question or a page respectively to delete it.
Customizing Scoring
The scoring feature yields a quantitative outcome for an assessment. For example, scoring a quality check questionnaire can help assess the operation quality of a particular site. This feature allows you to define a specific score for every option associated with a question based on its weightage. The application calculates the score for each question with respect to the user's response. The individual scores are then summed up to calculate the overall score of the analysis performed.
To add scores,
Navigate to the Scoring section of the corresponding survey /questionnaire. The scoring screen for Page 1 appears by default as shown below.

Click the (edit) icon corresponding to the page.
Enter the score for each option and click Done. The scores are now successfully updated.
Note: You can use the Reset option to revert the score for the line item to '0'. This option is displayed only when the scoring page is in edit mode.
Using the Workflow module, you can configure a particular action (for example, create a work order) to trigger based on the overall score calculated from the survey process. Read the Managing Workflows feature for more information.
Customizing Rules
Creating rules is defining the actions to execute based on the response recorded, indicating a condition, activity or its severity. That is, when the user selects a particular option to answer a question, the application triggers the respective action configured (if any). To customize a rule,
Navigate to the Rules section of the corresponding survey questionnaire. The screen to configure rules appears as shown below.

Click the Add Actions link corresponding to the option. The CREATE ACTION screen appears.
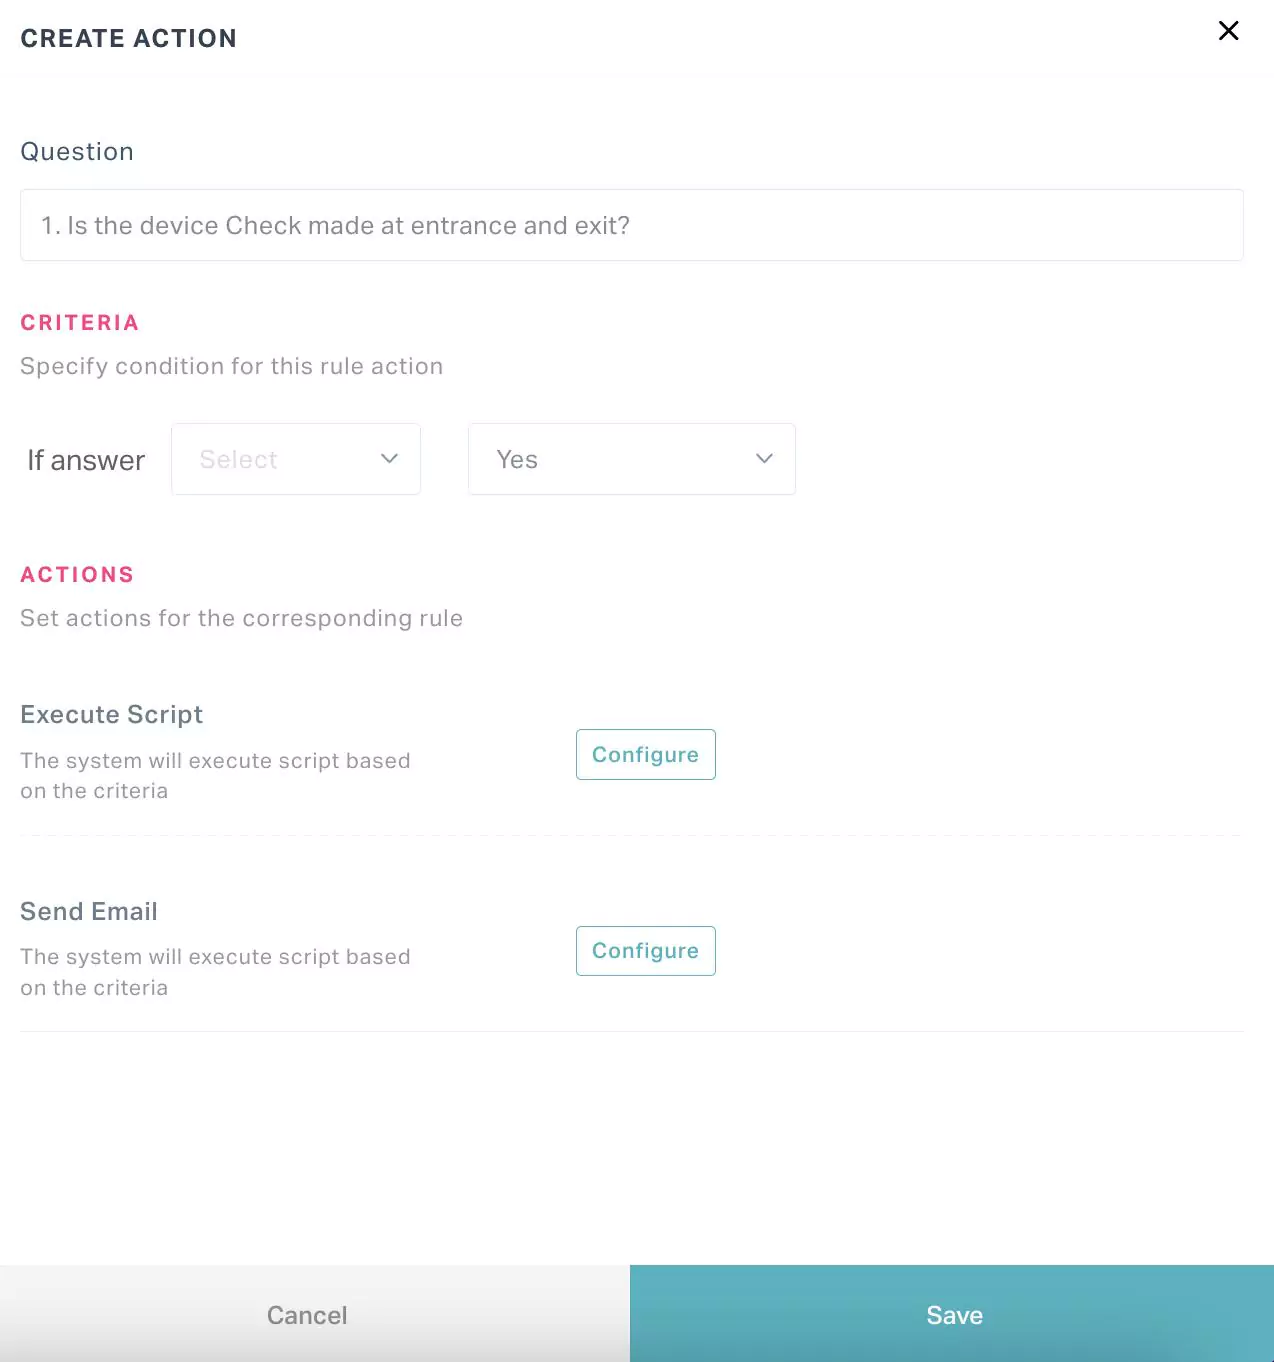
Click Configure against the required action in the ACTIONS section. You can choose to configure any of the following actions:
- Execute Script - To configure any action to execute through script. Read the Script Guide for details on working with scripts.
- Send Email - To trigger an email to the configured list of users
Click Save. The rules are now updated successfully.